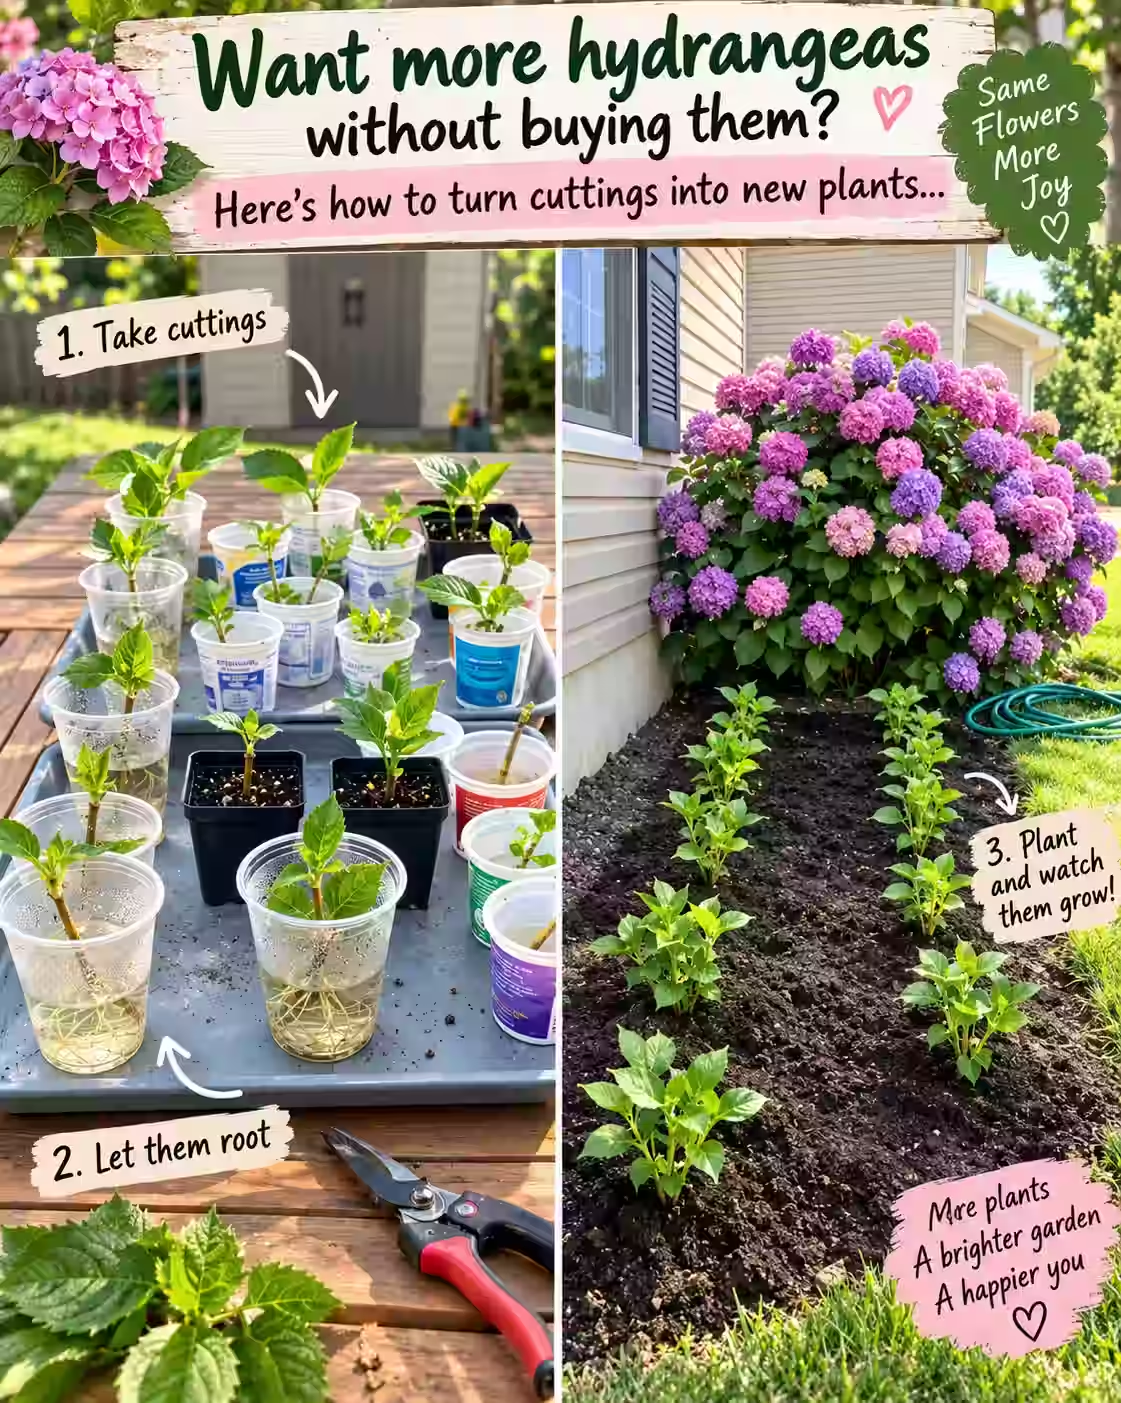
Hydrangeas are one of those garden plants that can make you want more of them the moment you see them in full bloom.
The good news is that you don’t necessarily have to buy another plant every time you want to add a hydrangea to your garden. You can create new plants from an established hydrangea by taking stem cuttings.
Once you understand which type of cutting to take, when to take it, and how to keep it from drying out, the process is much less intimidating than it first appears.
There are two main approaches: softwood cuttings, taken from younger flexible growth, and hardwood cuttings, taken after the stems have matured and become woody. Softwood cuttings generally root faster, while hardwood cuttings are slower and better suited to the dormant season.
Here’s how to get started.
When Should You Take Hydrangea Cuttings?
Timing matters, but there isn’t one universal date that works everywhere.
Your climate, the hydrangea variety, and the stage of growth all affect the best moment.
Softwood cuttings
Softwood cuttings are usually taken in late spring through early summer, when new stems are still flexible but have developed enough strength to stand upright.
In many climates, this falls roughly between May and July.
A good stem should bend slightly rather than snapping like an old woody branch.
Hardwood cuttings
Hardwood cuttings are taken during the dormant period, generally from late fall through winter.
The leaves have usually dropped and the current season’s growth has hardened into woody stems. These cuttings take longer to establish, so patience is important.
If you’re a beginner and have access to healthy flexible growth, softwood propagation is usually the easiest place to start.
What You’ll Need
You don’t need a greenhouse full of expensive equipment.
Gather:
- A healthy hydrangea
- Clean, sharp pruning shears
- A small pot or propagation container
- Quality potting mix
- A clear plastic bag or humidity dome
- Water
- Optional rooting hormone
Clean cutting tools are particularly important. Wiping your shears with rubbing alcohol before making your cuts can reduce the chance of transferring disease from one plant to another.
How to Propagate Hydrangeas From Softwood Cuttings
Step 1: Find a Healthy Stem
Start with a hydrangea that is actively growing and appears healthy.
Look for a young stem that is:
- Green or partially green
- Flexible
- Free from obvious disease
- Free from insect damage
- Not carrying a large flower head
A cutting around 4 to 6 inches long is a practical size for propagation.
Avoid weak, damaged, diseased, or excessively woody stems.
The quality of the cutting matters because you’re asking a relatively small piece of plant material to produce an entirely new root system.
Step 2: Make the Cutting
Using clean, sharp shears, make your cut just below a leaf node.
A leaf node is the point where a leaf joins the stem. These areas are important because they contain tissues capable of producing new roots.
Once you have your cutting, remove the leaves from the lower portion of the stem.
Leave a few healthy leaves toward the top.
If the remaining leaves are particularly large, you can trim the leaf surfaces slightly. This reduces the amount of water the cutting loses while it is still developing roots.
Step 3: Consider Rooting Hormone
Rooting hormone is optional.
Hydrangeas can root successfully without it, so don’t assume your project will fail if you don’t have a container of rooting powder sitting in the shed.
However, some gardeners use rooting hormone because it can encourage faster or more consistent rooting.
If you use it, lightly coat the prepared end of the cutting according to the product instructions.
Don’t bury the cutting in a thick layer of powder.
Step 4: Prepare the Growing Medium
The cutting needs a medium that holds some moisture while still allowing excess water to drain away.
A quality potting mix can work well. Some gardeners also use combinations containing materials such as sand, peat, or other propagation-friendly ingredients.
The most important thing is avoiding a waterlogged environment.
Hydrangea cuttings need moisture, but wet and soggy doesn’t mean better.
Step 5: Plant the Cutting
Make a small hole in the growing medium with your finger or a pencil.
Insert the lower portion of the stem into the mix, making sure at least one or two nodes are beneath the surface.
Firm the soil gently around the stem.
You don’t need to bury half the cutting.
The goal is simply to place enough of the stem underground for roots to develop while keeping the remaining leaves above the surface.
Step 6: Create a Humid Environment
This is one of the most important steps.
A cutting doesn’t have an established root system yet, so it can lose water through its leaves faster than it can replace it.
Place a clear plastic bag loosely over the pot or use a propagation dome.
The idea is to create a humid environment around the leaves without completely sealing the plant into a stagnant, soaking-wet container.
Make sure the plastic doesn’t constantly press against the leaves.
Where Should You Put the Cutting?
Don’t place a fresh hydrangea cutting on a sunny windowsill where it receives intense direct afternoon sunlight.
Instead, give it bright, indirect light.
A warm, sheltered location with good ambient light is generally much more suitable.
The cutting needs enough light to remain healthy, but excessive direct sun can cause it to lose water quickly and wilt before roots have formed.
Keep the Medium Lightly Moist
This is where many beginners go wrong.
It’s easy to think that more water will produce roots faster.
Unfortunately, constantly saturated soil can create the opposite result.
Check the growing medium regularly. If the surface is beginning to dry, provide enough moisture to keep the medium lightly damp.
Avoid allowing the pot to sit in standing water.
Humidity around the leaves is helpful; waterlogged roots are not.
How Long Does It Take to Root?
Softwood hydrangea cuttings can begin developing roots in approximately two to four weeks under favorable conditions, although the exact timing can vary.
Don’t pull the cutting out every few days to see whether roots have appeared.
That can damage the developing root system.
Instead, watch the plant.
New growth can be an encouraging sign, although it isn’t absolute proof that a strong root system has developed.
After enough time has passed, you can very gently check whether the cutting offers resistance when lightly tugged.
Resistance can indicate that roots are beginning to anchor it.
What About Hardwood Cuttings?
If you miss the softwood window, you still have another option.
Hardwood propagation uses mature stems that have become firm and woody.
These are generally collected after the plant has entered dormancy, often from late fall through winter.
Cut a healthy mature stem into sections, generally keeping the pieces relatively short.
Remove remaining foliage if necessary and insert the cutting into an appropriate growing medium.
Hardwood cuttings are tougher than fresh softwood, but they are also slower.
Don’t expect immediate results.
Depending on conditions, they may spend much of the winter developing roots before obvious above-ground growth appears in spring.
Do You Really Need Rooting Hormone?
No.
It’s helpful to think of rooting hormone as an optional tool rather than a requirement.
Many gardeners successfully propagate plants without it.
If you have rooting hormone, you can certainly use it according to the label. If you don’t, don’t let that stop you from trying.
The fundamentals matter more:
Healthy cutting + suitable moisture + high humidity + indirect light + patience.
Get those conditions right and you already have the essentials.
What About Honey, Willow Water, or Aloe?
You’ll find plenty of homemade rooting recipes online.
Honey, willow water, and aloe vera are sometimes suggested as alternatives to commercial rooting products. The original guide discusses these approaches as traditional DIY options.
However, I wouldn’t make them the foundation of your propagation strategy.
If you’re new to propagating hydrangeas, you’re better off first mastering the basics rather than adding several homemade treatments at once.
Try a few cuttings with a straightforward setup and see how your plants respond.
That gives you a much clearer idea of what is actually working.
The Most Common Hydrangea Propagation Mistakes
1. Taking a cutting from a sick plant
If the parent plant has obvious disease, don’t use it as your source material.
Start with healthy growth.
2. Using a stem that’s too old
Very woody stems aren’t ideal when you’re trying to make quick softwood cuttings.
Choose young, flexible growth during the appropriate season.
3. Leaving too many leaves
A cutting with a huge amount of foliage can lose water quickly.
Removing the lower leaves and reducing excessive leaf area can make the cutting easier to manage.
4. Keeping the soil soaking wet
Moist doesn’t mean saturated.
Good drainage is essential.
5. Putting cuttings in direct sunlight
Intense sunlight can cause a rootless cutting to wilt rapidly.
Bright, indirect light is a safer starting point.
6. Checking for roots too often
Propagation requires patience.
Give your cutting time to work before disturbing it.
When Can You Move a New Hydrangea?
Don’t rush the transplanting stage.
Once the cutting has developed a healthy root system and is producing new growth, begin transitioning it gradually to its new environment.
If it has been growing under a humidity dome or plastic covering, don’t suddenly expose it to harsh outdoor conditions.
Instead, gradually increase ventilation and outdoor exposure.
This process helps the young plant adjust without experiencing unnecessary stress.
Once the plant is established and has developed enough growth, you can move it into a larger container or an appropriate garden location.
One Hydrangea Can Become Several
That’s the fun part of propagation.
Instead of buying several mature hydrangeas, you can take multiple cuttings from a suitable parent plant and potentially create several young plants.
Not every cutting will necessarily succeed, so don’t be discouraged if you lose one or two.
For beginners, taking several cuttings at once can actually be a better strategy than putting all your hopes into a single stem.
Give each one similar conditions, keep the moisture balanced, and let time do the rest.
Final Thoughts
Propagating hydrangeas may look complicated when you first see all the different advice online, but the basic process is surprisingly straightforward.
Choose healthy growth, take the cutting at the right stage, remove unnecessary leaves, provide a well-draining growing medium, maintain humidity without creating soggy conditions, and keep the cutting in bright indirect light.
Softwood cuttings are generally the quicker route, while hardwood cuttings offer a slower dormant-season approach.
And remember: you don’t need a greenhouse, expensive equipment, or a shelf full of rooting products to give it a try.
Sometimes a clean pair of shears, a small pot, and a little patience are enough to turn one beautiful hydrangea into several more.


