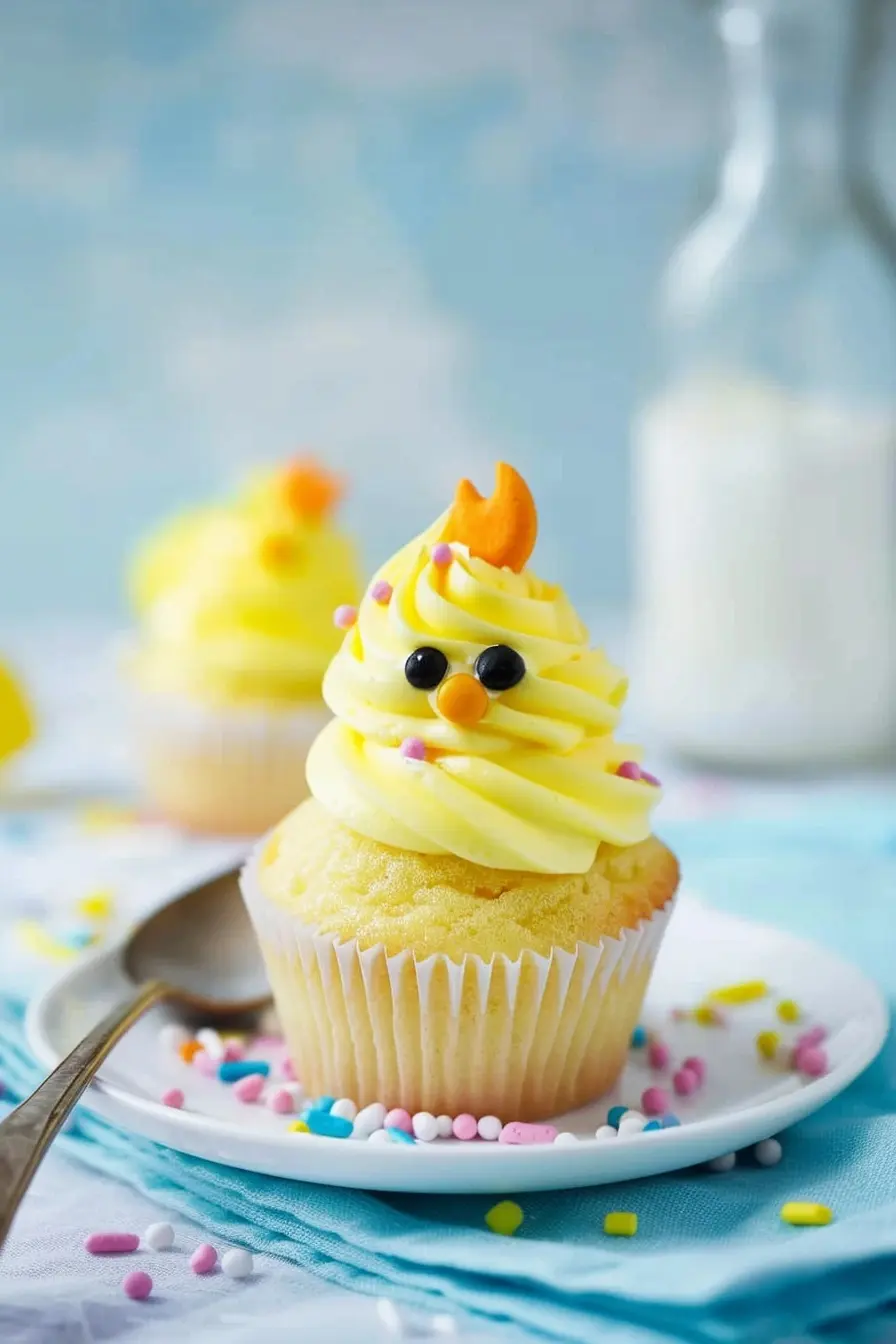
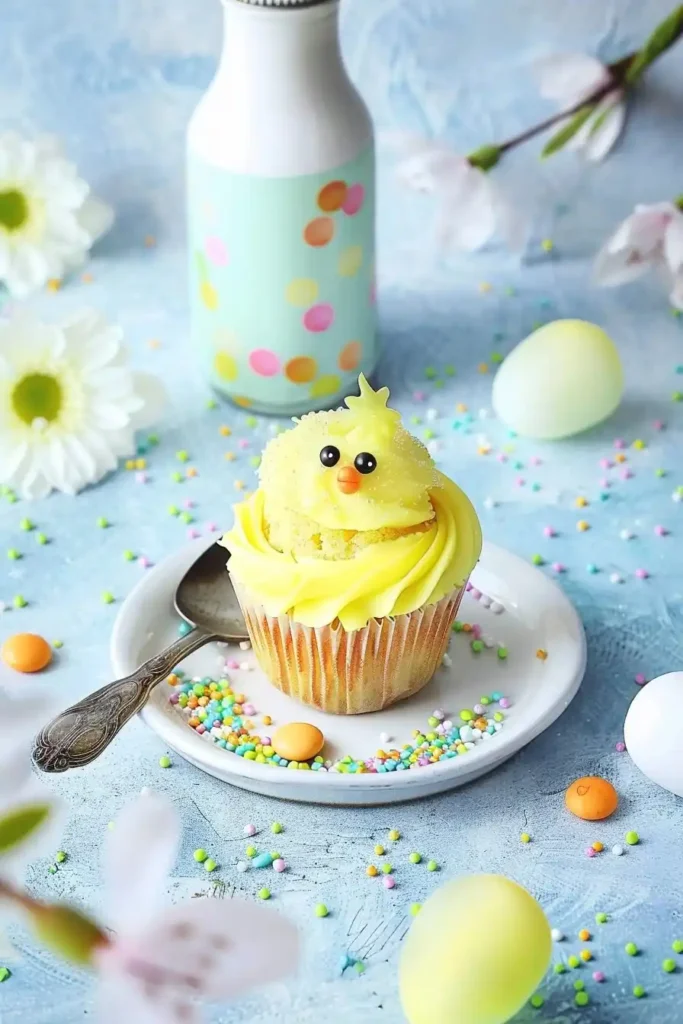
These Easter Chick Cupcakes are absolutely adorable, deliciously sweet treats that bring spring joy to your holiday table. Fluffy vanilla cupcakes topped with buttery yellow frosting and decorated to look like baby chicks will delight both children and adults alike, making them the perfect centerpiece for your Easter celebrations.
Why You’ll Love This Recipe
- Adorably Festive: These cute little chick cupcakes make an immediate visual impact at any Easter gathering
- Impressive Yet Simple: While they look professionally made, they’re actually quite straightforward to create
- Customizable: You can easily adjust the colors or design elements to match your Easter theme
- Kid-Friendly Activity: Decorating these cupcakes makes for a fun family activity with children
- Delicious Taste: Beyond their cute appearance, they feature a light, moist vanilla cupcake with silky Swiss meringue buttercream
Ingredients
For the Cupcakes:
- Granulated Sugar: Provides the perfect sweetness for these light and fluffy cupcakes
- Cake Flour: Creates a more delicate texture than all-purpose flour for these tender cupcakes
- Baking Powder & Baking Soda: The leavening agents that help your cupcakes rise properly
- Salt: Enhances all the flavors and balances the sweetness
- Unsalted Butter: Adds richness and helps create the fine crumb texture
- Eggs: Provide structure and richness to the cupcakes
- Full-Fat Sour Cream: Creates moisture and tenderness in the cupcake crumb
- Vegetable Oil: Helps keep the cupcakes moist for days
- Vanilla Extract: Adds warm, aromatic flavor to the cupcakes
- Milk: Adds moisture and helps create the perfect batter consistency
For the Swiss Meringue Buttercream:
- Granulated Sugar: Creates the sweet base for this silky frosting
- Egg Whites: The foundation for this meringue-based buttercream
- Unsalted Butter: Creates the rich, creamy texture of the frosting
- Vanilla Extract: Adds flavor to complement the cupcakes
- Yellow Food Coloring: Gives the frosting its chick-like appearance
For Decorating:
- Orange Candy Melts: Used to create the beaks and feet of your chicks
- Vegetable Shortening: Helps thin the candy melts for easier piping
- Black Nonpareils: Perfect for creating the chick’s eyes
Variations
- Chocolate Cupcakes: Substitute chocolate cupcakes for a different flavor profile while keeping the same cute decoration
- Lemon Chicks: Add lemon zest to the batter and a touch of lemon extract to the frosting for bright spring flavor
- Coconut Nest: Add toasted coconut around the base of each chick to create a “nest” effect
- Colored Chicks: Make some chicks in pastel blue, pink, or purple for a colorful Easter basket look
- Mini Versions: Create bite-sized chick cupcakes using a mini cupcake pan
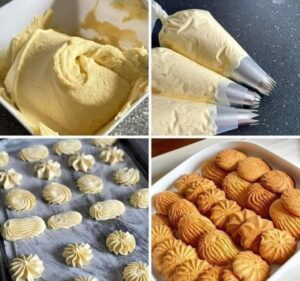
How to Make the Recipe
- Begin by combining your dry cupcake ingredients, creating a fine, crumbly mixture with the butter.
- Whisk your wet ingredients separately before combining them with the dry ingredients.
- Add milk to achieve a smooth, lump-free batter.
- Fill your cupcake liners and bake until perfectly golden and springy to the touch.
- For the Swiss meringue buttercream, cook the sugar syrup until clear while whipping egg whites to stiff peaks.
- Combine the hot syrup with the egg whites and whip until cooled.
- Gradually add butter and continue whipping until thick and smooth, then add yellow coloring.
- Melt and pipe orange candy melts to create the beaks and feet, allowing them to set.
- Pipe the yellow frosting in two tiers to create the chick’s body and head.
- Add the candy melt features and black nonpareil eyes to complete your adorable chicks.
Tips for Making the Recipe
- Room Temperature Ingredients: Make sure your butter, eggs, and milk are at room temperature for the best texture and rise.
- Don’t Overmix: Mix just until ingredients are combined to avoid tough cupcakes.
- Swiss Meringue Patience: The buttercream may look curdled before it comes together—keep whipping!
- Candy Melt Preparation: Make the beaks and feet ahead of time so they can set properly before decorating.
- Piping Technique: Practice your piping technique on a plate first to get comfortable with creating the chick shape.
- Color Intensity: Add the yellow food coloring gradually to achieve your desired shade.
How to Serve
- Arrange these cupcakes on a tiered stand surrounded by Easter grass for a showstopping display
- Place each cupcake in an individual Easter-themed cupcake holder for easy serving at gatherings
- Pair with fresh berries or chocolate eggs for a complete Easter dessert spread
- Serve alongside hot chocolate for children or coffee for adults
Make Ahead
- Bake the cupcakes up to 2 days ahead and store in an airtight container at room temperature
- Prepare the buttercream 1-2 days in advance and refrigerate; bring to room temperature and re-whip before using
- Make the candy melt decorations several days ahead and store in an airtight container
- Fully decorated cupcakes can be refrigerated overnight, but are best served at room temperature
FAQs
Can I use all-purpose flour instead of cake flour?
Yes, you can substitute all-purpose flour, but your cupcakes might be slightly denser. For each cup of cake flour, use 1 cup of all-purpose flour minus 2 tablespoons, plus 2 tablespoons of cornstarch.
Why did my Swiss meringue buttercream curdle?
This is normal! Continue whipping and it will come together into a smooth, silky frosting. If it’s too warm, refrigerate for 10-15 minutes, then resume whipping.
Can I make these cupcakes without candy melts?
Absolutely! You can use fondant, marzipan, or even small pieces of orange fruit leather for the beaks and feet.
How long will these cupcakes stay fresh?
These cupcakes will stay fresh for 2-3 days in an airtight container at room temperature, or up to 5 days refrigerated.
Conclusion
These Easter Chick Cupcakes are more than just a dessert—they’re a delightful seasonal activity and a memorable addition to your Easter celebration. The combination of tender vanilla cupcakes and silky buttercream creates a delicious treat, while the adorable chick decoration brings springtime joy to your table. Whether you’re a seasoned baker or trying a creative project with kids, these cupcakes are sure to become a cherished Easter tradition that everyone looks forward to year after year.
Print
Easter Chick Cupcakes: Adorable Spring Treats Perfect for Celebrations
Adorable Easter Chick Cupcakes featuring light, fluffy vanilla cupcakes topped with silky yellow buttercream frosting and cute candy melt decorations. These festive treats are perfect for spring celebrations and will delight both children and adults with their charming appearance and delicious taste.
Ingredients
For the cupcakes:
- 1 cup granulated sugar
- 1 3/4 cups cake flour, not self-rising
- 1 1/2 tsp baking powder
- 1/2 tsp baking soda
- 1/2 tsp salt
- 1/4 cup unsalted butter, at room temperature
- 2 eggs
- 1/3 cup full-fat sour cream
- 1/4 cup vegetable oil
- 1 tbsp vanilla extract
- 2/3 cup milk, at room temperature
For the frosting:
- 6 tbsp water
- 1 1/3 cup granulated sugar
- 6 egg whites
- 3 sticks unsalted butter
- 1 tsp vanilla extract
- Yellow food coloring
For decorating:
- 1/4 tsp vegetable shortening
- 2 oz orange candy melts
- Black nonpareils
Instructions
- Prepare the Cupcake Batter: Stir together the cake flour, granulated sugar, baking powder, baking soda, and salt in a large bowl until well combined. This dry mixture forms the foundation of your light and fluffy cupcakes, ensuring proper structure and texture.
- Incorporate the Butter: Slowly beat the room temperature butter into the dry ingredients using an electric mixer on medium speed for about 3 minutes, until the mixture resembles fine crumbs. This technique, known as the reverse creaming method, coats the flour particles with fat, resulting in a more tender crumb structure.
- Add Wet Ingredients: In a separate bowl, whisk together the sour cream, eggs, vegetable oil, and vanilla extract until smooth. Gradually add this wet mixture to the dry ingredients, whisking until just combined. The sour cream adds moisture and tanginess while the oil ensures the cupcakes stay soft even when refrigerated.
- Finish the Batter: Slowly add the room temperature milk to the batter, whisking until completely smooth and lump-free. The milk adds additional moisture and helps create a pourable batter with the perfect consistency for even baking.
- Bake the Cupcakes: Pour the batter into a lined cupcake pan, filling each liner approximately 2/3 full to allow room for rising. Bake in a preheated 350°F oven for 14-16 minutes, or until a toothpick inserted in the center comes out clean. The cupcakes should be lightly golden on top and spring back when gently touched.
- Start the Frosting: In a small saucepan, combine the water and sugar for the frosting. Heat over medium heat, stirring until the sugar dissolves, then bring to a boil. Continue cooking until the syrup is completely clear, reaching approximately 240°F (soft-ball stage) on a candy thermometer.
- Prepare Egg Whites: While the syrup cooks, whip the egg whites in the bowl of a stand mixer fitted with the whisk attachment until stiff peaks form. The whites should be glossy and hold their shape when the whisk is lifted.
- Create Swiss Meringue: With the mixer running on high speed, carefully pour the hot sugar syrup down the side of the bowl into the whipped egg whites. Continue whipping for about 10 minutes until the mixture has cooled to room temperature. The hot syrup cooks the egg whites and creates a stable meringue base.
- Add Butter: Reduce the mixer speed to low and gradually add the butter, one tablespoon at a time, allowing each addition to incorporate before adding more. This slow addition prevents the butter from melting and ensures a smooth emulsion.
- Finish the Buttercream: Increase the mixer speed to high and whip until the frosting becomes thick and smooth. The mixture may appear curdled at first, but continued whipping will bring it together into a silky, pipeable consistency. Add the vanilla extract and yellow food coloring, mixing on low speed until evenly distributed and completely smooth.
- Prepare Decorations: In a small microwave-safe bowl, combine the orange candy melts with vegetable shortening. Microwave in 10-second increments, stirring between each, until completely melted and smooth. The shortening helps thin the candy for easier piping.
- Create Chick Features: Transfer the melted orange candy to a small piping bag, clip a small opening at the tip, and pipe beaks and feet shapes onto parchment paper. Allow them to cool and harden completely before handling. These will become the adorable features of your chick cupcakes.
- Assemble the Cupcakes: Spoon the yellow buttercream into a piping bag fitted with a large round tip (such as Ateco 809). Pipe a large dollop onto each cooled cupcake to form the chick’s body, then pipe a smaller dollop on top to create the head. The two-tier design creates the distinctive chick shape.
- Add Final Touches: Complete each chick by gently pressing two black nonpareils into the front of the smaller frosting dollop for eyes. Add an orange candy melt beak in the center and position two of the candy melt feet at the base of the larger frosting dollop. These finishing touches transform simple cupcakes into charming Easter chicks.
Notes
- For best results, ensure all refrigerated ingredients are at room temperature before starting.
- The frosting used is a Swiss meringue buttercream, which is less sweet than traditional American buttercream and has a silky texture.
- If your buttercream appears curdled during mixing, continue whipping – it will come together.
- You can prepare the candy melt decorations a day in advance and store them in an airtight container.
- For a time-saving alternative, you can use store-bought vanilla frosting colored yellow.
- These cupcakes can be stored in an airtight container at room temperature for 2 days or refrigerated for up to 5 days.