This innovative tuna melt wrap represents the perfect evolution of the beloved diner classic, transforming the traditional open-faced sandwich into a portable, handheld masterpiece that delivers all the satisfying flavors of melted cheese and seasoned tuna in a crispy, golden tortilla package. The genius of this recipe lies in its ability to combine the nostalgic comfort of a classic tuna melt with the convenience of modern wrap technology, creating a meal that’s equally at home in a lunch box, at a picnic, or as a quick weeknight dinner that satisfies both hunger and the craving for familiar, comforting flavors.
The Evolution of the Classic Tuna Melt
The Tuna Melt Wrap embodies the contemporary approach to comfort food reinvention, where traditional diner favorites are reimagined through modern culinary techniques and presentation styles. Born from the American diner tradition of the 1950s tuna melt sandwich, this recipe honors the original’s core elements while enhancing them with fresh ingredients and improved nutritional balance. The transformation from open-faced sandwich to wrapped format reflects the modern lifestyle’s demand for portable, mess-free meals that don’t compromise on flavor or satisfaction, making this dish a perfect example of how classic recipes can evolve to meet contemporary needs.
Understanding the Science of Flavor Balance and Texture
The success of this tuna melt wrap lies in the sophisticated balance of creamy, tangy, and savory elements that create a harmonious flavor profile while maintaining textural contrast. The Greek yogurt provides the creamy base while adding protein and probiotics, while the Dijon mustard contributes sharp, tangy complexity that cuts through the richness. The lemon juice not only brightens the overall flavor but also helps preserve the tuna’s color and freshness. The corn adds natural sweetness and textural pop, while the red onion provides sharp bite and the dill relish or capers introduce briny, herbaceous notes that elevate the entire mixture from simple to sophisticated.
Ingredients
Wrap Base
- 1 can (5 oz) skipjack or yellowfin tuna
- 2 tablespoons Greek yogurt
- 1/2 tablespoon Dijon mustard
- 1 tablespoon lemon juice (1/2 lemon)
- 1/4 cup corn
- 1/4 cup diced red onion
- 1 tablespoon dill relish or capers
- 1/2 teaspoon garlic powder
- 1/4 teaspoon black pepper
Assembly
- 1 burrito-sized wrap (at least 10 inches)
- 1/4 cup shredded mozzarella cheese
- Olive oil for grilling
Instructions
- Tuna Mixture Preparation: Combine thoroughly drained tuna with Greek yogurt, Dijon mustard, lemon juice, corn, diced red onion, dill relish or capers, garlic powder, and black pepper, mixing until all ingredients are evenly distributed and well incorporated.
- Wrap Preparation: Warm the tortilla briefly in a dry skillet or microwave for 15-20 seconds to make it more pliable and easier to fold without cracking.
- Strategic Assembly: Layer the shredded mozzarella cheese and tuna mixture in the center of the warmed tortilla, leaving approximately 2 inches of space at the edges to prevent overflow during rolling.
- Professional Wrapping Technique: Fold the left and right sides of the tortilla inward, then fold the bottom edge up and over the filling. Roll the wrap away from you, keeping the filling tight and compact to ensure structural integrity.
- Golden Grilling: Cook the wrapped tuna melt in an oiled skillet over medium heat for 3-4 minutes per side until the exterior is golden brown and crispy, and the cheese is completely melted throughout.
Professional Tips for Perfect Results
Tuna Selection: Choose high-quality skipjack or yellowfin tuna packed in water for optimal flavor and texture. Drain thoroughly to prevent soggy wraps.
Yogurt Choice: Use thick Greek yogurt for the best texture and binding properties. Low-fat varieties work well while maintaining creaminess.
Wrap Selection: Choose large, flexible tortillas that can accommodate the filling without tearing. Whole wheat or spinach varieties add nutritional value.
Temperature Control: Cook over medium heat to ensure even browning without burning the tortilla before the cheese melts.
Pressing Technique: Gently press the wrap with a spatula while cooking to ensure even contact with the pan and uniform browning.
Troubleshooting Common Issues
Soggy Wraps: Ensure tuna is thoroughly drained and avoid overfilling. Pat the tuna mixture with paper towels if necessary.
Wrap Tearing: Warm tortillas properly before filling and don’t overstuff. Use room temperature ingredients when possible.
Uneven Browning: Maintain consistent medium heat and ensure the pan is evenly heated before adding the wrap.
Cheese Not Melting: Cook longer on lower heat, or cover the pan for the last minute to trap heat and melt the cheese thoroughly.
Filling Falling Out: Leave adequate border space and ensure tight rolling technique. Secure with toothpicks if necessary.
Creative Variations and Adaptations
While the classic version is perfection, this recipe serves as an excellent foundation for creative interpretations:
Cheese Alternatives: Try sharp cheddar, Swiss, or pepper jack for different flavor profiles and melting characteristics.
Vegetable Additions: Diced celery, bell peppers, or cucumber add crunch and freshness to the filling.
Protein Enhancements: Mix in hard-boiled egg pieces or crispy bacon bits for additional richness and texture.
Spice Variations: Add hot sauce, jalapeños, or chipotle peppers for heat and smoky complexity.
Herb Upgrades: Fresh dill, parsley, or chives provide aromatic brightness and color contrast.
Bread Alternatives: Use lavash, naan, or large lettuce leaves for different textures and dietary preferences.
Storage and Meal Prep Guidelines
This tuna melt wrap is best enjoyed immediately after cooking for optimal texture and cheese meltiness. However, the tuna mixture can be prepared up to 2 days in advance and stored in the refrigerator, making assembly quick and convenient. Assembled but uncooked wraps can be stored wrapped in plastic for up to 4 hours before cooking. Cooked wraps should be consumed immediately for best results, though they can be reheated in a dry skillet over low heat for 2-3 minutes per side.
Nutritional Benefits and Dietary Considerations
This tuna melt wrap provides excellent nutritional value through its combination of lean protein from tuna, probiotics from Greek yogurt, and complex carbohydrates from the tortilla. The corn contributes fiber and natural sweetness, while the red onion provides antioxidants and anti-inflammatory compounds. The dish is naturally high in protein and can easily be modified for various dietary needs by choosing appropriate tortilla types or cheese alternatives.
Serving Suggestions and Accompaniments
This versatile wrap pairs beautifully with crispy sweet potato fries, fresh fruit salad, or a simple green salad with vinaigrette. For beverages, consider iced tea, lemonade, or a crisp white wine. The wrap can be cut in half diagonally for easier eating and attractive presentation, making it perfect for lunch boxes, picnics, or casual entertaining.
Frequently Asked Questions
Q: Can I use fresh tuna instead of canned? A: Yes, but cook the fresh tuna first, then flake it. Canned tuna provides convenience and consistent texture for this recipe.
Q: What if I don’t have Greek yogurt? A: Substitute with regular yogurt drained through cheesecloth, or use mayonnaise for a more traditional tuna salad approach.
Q: Can I make this ahead of time? A: The tuna mixture can be prepared in advance, but wrap and cook just before serving for optimal texture.
Q: How do I prevent the wrap from falling apart? A: Ensure proper rolling technique, don’t overfill, and cook seam-side down first to help seal the wrap.
Q: Can I freeze these wraps? A: It’s not recommended due to the yogurt and vegetables, which don’t freeze well. Make fresh for best results.
Q: What’s the best way to reheat leftovers? A: Reheat in a dry skillet over low heat, turning carefully to avoid breaking the wrap.
Q: Can I make this vegetarian? A: Substitute chickpeas or white beans for tuna, mashed with the same seasonings for a protein-rich vegetarian version.
Q: How do I know when it’s done cooking? A: The wrap should be golden brown and crispy on the outside, and the cheese should be melted throughout.
This tuna melt wrap recipe represents the perfect balance of nostalgic comfort and modern convenience, delivering a satisfying meal that transforms a classic favorite into a portable, practical format that fits seamlessly into contemporary lifestyles while maintaining all the flavors that make comfort food so beloved and enduring.
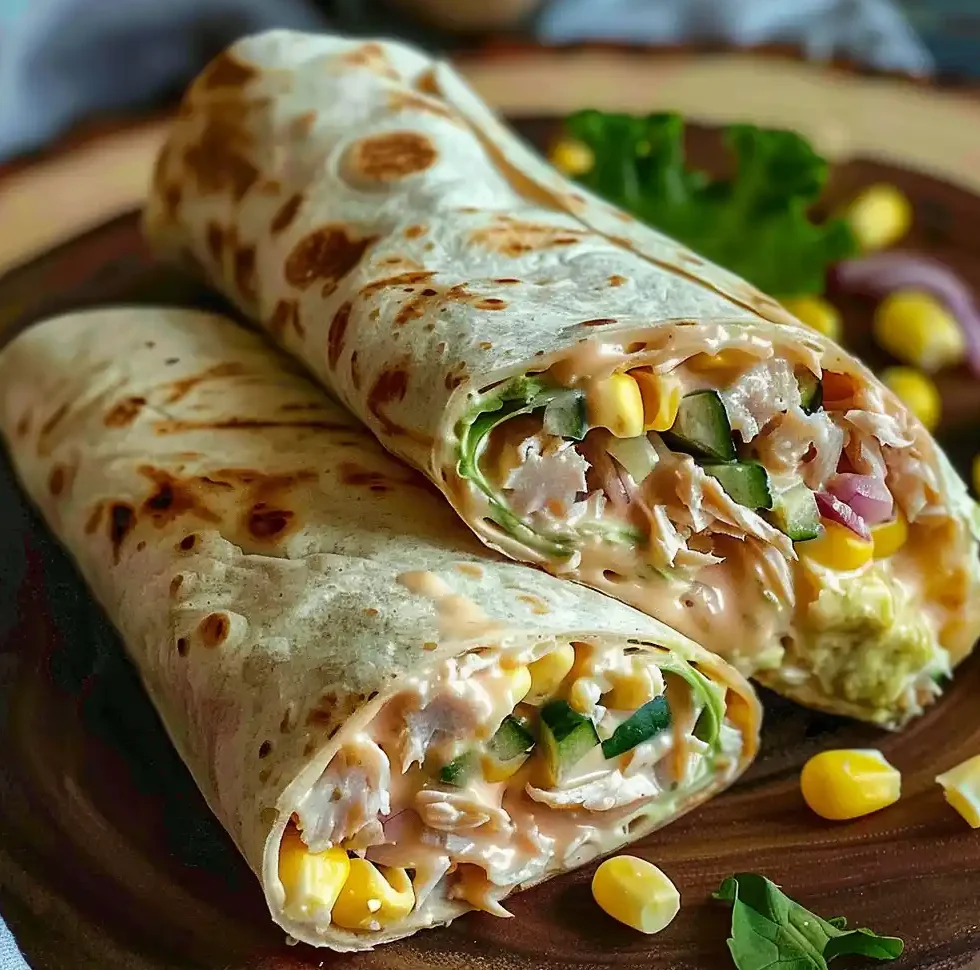
Tuna Melt Wrap
Ingredients
Method
- Prepare the Tuna Filling
- Drain the can of tuna thoroughly and place in a medium bowl. Add the Greek yogurt, Dijon mustard, lemon juice, corn, diced red onion, dill relish or capers, garlic powder, and black pepper. Mix all ingredients until well combined and the mixture has a consistent texture. The yogurt provides creaminess while the mustard and lemon juice add tanginess.
- Prepare the Wrap
- Warm the burrito-sized wrap briefly in a microwave for 10-15 seconds or in a dry skillet for a few seconds on each side. This makes the wrap more pliable and easier to fold. Place the wrap on a clean, flat surface. Sprinkle the shredded mozzarella cheese evenly over the center of the wrap, leaving about a 2-inch border around the edges.
- Add Filling and Fold
- Spoon the tuna mixture onto the center of the wrap, on top of the cheese. Be careful not to overfill as this can make folding difficult. To fold, bring in both sides of the wrap toward the center. Then, fold the bottom edge up over the filling and continue to roll away from you, keeping the filling tight within the wrap. The goal is to create a secure package that won’t come apart during cooking.
- Grill the Wrap
- Heat a skillet over medium heat and add a small amount of olive oil. Once hot, place the wrap seam-side down in the skillet. Cook for 3-4 minutes until golden brown, then carefully flip and cook for another 3-4 minutes on the other side. The cheese should be melted and the wrap should be crispy and golden. If needed, you can press down gently with a spatula to ensure even contact with the pan.
Notes
- For a healthier option, use whole grain wraps which provide more fiber.
- You can substitute Greek yogurt with mayonnaise for a richer taste.
- Add diced celery or bell peppers for extra crunch and nutrients.
- Canned tuna packed in water is preferable for a lighter option compared to oil-packed tuna.
- Leftover tuna filling can be stored in the refrigerator for up to 2 days.