The elegant, ruffled blooms of the iris are a true garden classic. From deep, velvety purples to cheerful, sunny yellows, they stand tall and proud, marking the joyful peak of late spring. But to keep these beauties coming back year after year in all their glory, they need a little help from us. They need room to breathe.
If your iris patch is looking a little tired and crowded, don’t worry. Dividing them isn’t a complicated chore; it’s an act of renewal. Think of it as a simple reset that guarantees a healthier patch and an even more spectacular show of flowers next year.
The Gardener’s Calendar: Why Late Summer is Prime Time
Ask any seasoned gardener when to divide irises, and they’ll likely point you to the window between late summer and early fall. There’s a beautiful logic to this timing that follows the iris’s natural rhythm.
After their brilliant floral performance in the spring, irises take a well-deserved nap during the heat of summer. While they look quiet above ground, their underground stems—the rhizomes—are busy storing up energy. By the time late summer rolls around, these rhizomes are plump, charged, and ready for the next chapter. Dividing them now gives the new transplants plenty of time to set down roots in the warm soil, getting comfortably established long before the first deep frost of winter.
Is Your Iris Patch Trying to Tell You Something?
Your irises will give you clear signals when they’re feeling cramped. You just have to know what to look for:
- Fewer Flowers: This is the most obvious sign. If your once-prolific patch is suddenly shy about blooming, it’s likely because the rhizomes are fighting for limited nutrients and light.
- A “Bald Spot” in the Middle: You might notice the center of the clump looks dead and woody, while all the new growth is happening around the edges. This is a classic sign of overcrowding.
- Exposed Rhizomes: Are the rhizomes pushing themselves up and out of the soil? When they become exposed like this, they risk getting scorched by the sun and losing their vigor.
If you see any of these signs, it’s time to grab your tools and give them the space they crave.
The Simple Surgery: How to Divide Your Irises, Step by Step
This process is straightforward and incredibly rewarding. Set aside an hour on a cooler, overcast day to reduce stress on the plants.
Gather Your Tools
You don’t need much. Have these essentials on hand:
- A garden fork or spade
- A sharp, clean knife (a serrated steak knife works wonderfully on tough rhizomes)
- Pruning shears for trimming leaves
- A bucket or tarp to hold the divisions
- A hose or bucket of water for rinsing
The Process
- Lift with Care: Begin by using your garden fork to gently dig around and lift the entire iris clump out of the ground. Try to get well underneath it to keep the rhizomes intact.
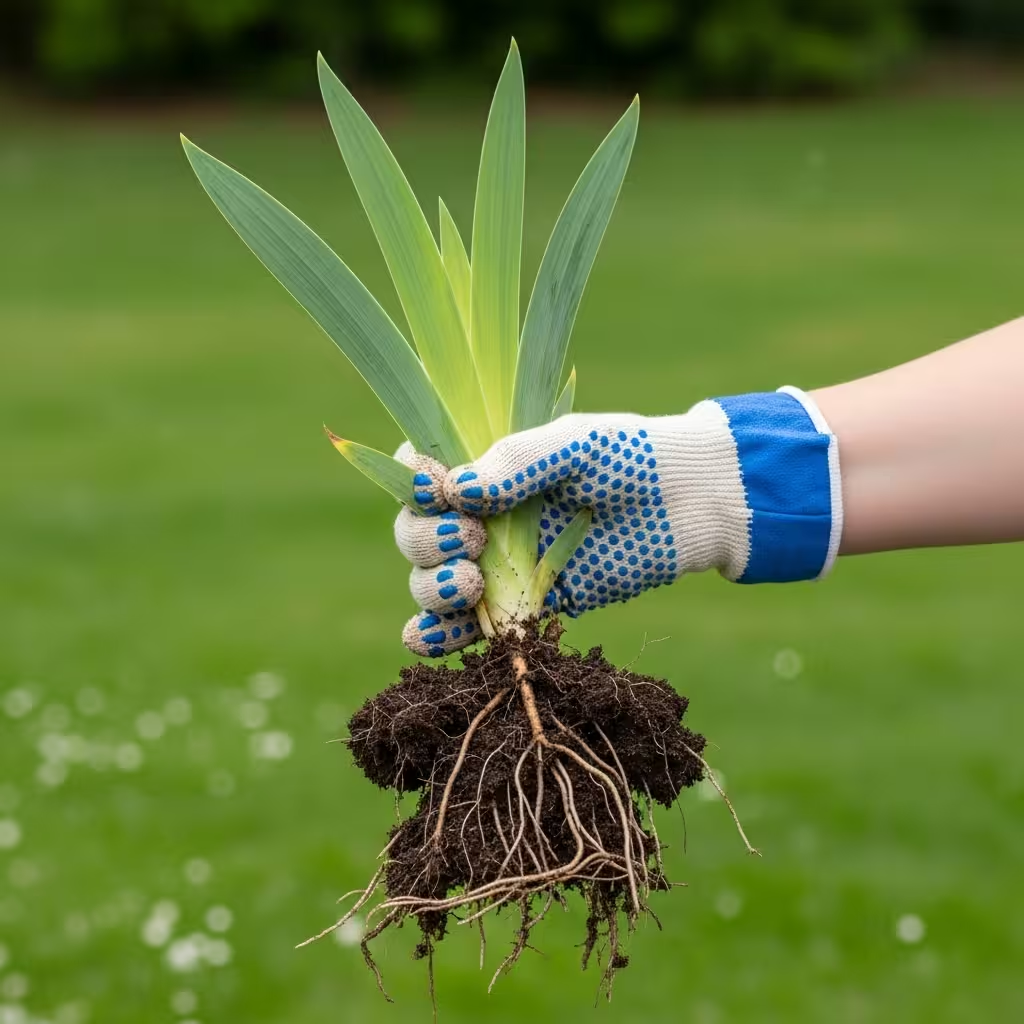
- Clean and Inspect: Gently shake off the loose soil. I find it’s best to use a hose to wash the rhizomes completely clean. This lets you see exactly what you’re working with—you can easily spot the healthy, vigorous parts from the old, spent sections.
- Make the Cut: Look for the natural division points. You’ll see thick, healthy rhizomes with a fan of leaves and a set of white, healthy roots. These are your keepers. Using your sharp knife, cut these healthy sections away from the old, woody center. Each new division should have at least one strong leaf fan and a good cluster of roots. Don’t be afraid to be firm. Discard any rhizomes that are soft, hollow, or show signs of rot.
- A Quick Haircut: Trim the fan of leaves down to about 4-6 inches. This helps the plant focus its energy on root production instead of supporting long leaves, and it prevents wind from rocking the new transplant.
- Replant with Purpose: Choose a sunny, well-drained spot for your new divisions. Irises hate sitting in water. Plant them about 12-18 inches apart to give them room to grow. This is the most crucial step: plant them shallow. The top of the rhizome should be just barely visible at the soil line. If you bury it too deep, it will rot.
A Few Common Pitfalls (and How to Avoid Them)
- Planting Too Deep: This is the #1 mistake. Remember, irises like to feel the sun on their backs. Keep the top of the rhizome level with or just slightly above the soil.
- Waiting Too Long: Don’t put this task off until late fall. The plants need at least 4-6 weeks of mild weather to establish roots before winter.
- Forgetting to Discard the Old: Be ruthless about throwing away the old, non-productive center of the clump. It won’t bloom again and can harbor pests or disease.
Tucking Them In: Aftercare for Your New Divisions
Once your new iris divisions are planted, give them a thorough watering to help the soil settle in around the roots. Water them every few days for the first couple of weeks, especially if the weather is dry. After that, they are remarkably drought-tolerant. A light layer of mulch around the plants (but not touching the rhizomes) can help retain moisture.
The Reward: A Rejuvenated, Breathtaking Display
Come next spring, you’ll be so glad you took the time for this simple task. By dividing your irises, you not only improve the health and vigor of the plants, but you also multiply your stock. The result will be a breathtaking, uncluttered display of vibrant blooms and, of course, plenty of new plants to expand your garden or share with lucky friends.
Happy dividing!
Related posts:
 10 Easiest Flowering Plants to Grow in Pots: A Beginner’s Guide to Container Gardening Success
 Essential Post-Bloom Peony Care: 10 Expert Tips for Thriving Gardens
 Summer Bee Rescue: Creating Life-Saving Garden Stations That Actually Work
 8 Crucial Post-Bloom Peony Care Steps That Guarantee Spectacular Blooms Next Year
 How to Grow Unlimited Blueberries at Home: The Simple Propagation Method That Saves Thousands
 The Terracotta Pot Secret: How to Grow Thriving Rosemary Plants That Never Turn Brown
 How to Build the Perfect Backyard Fire Pit: A Complete DIY Guide
 Say Goodbye to Mosquitoes Forever: How to Turn Your Yard into a Dragonfly War Zone