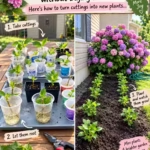
Why buy a single rosemary plant when you could have a whole hedge for free? Propagating rosemary is one of the most rewarding “garden hacks” because it allows you to turn a few trimmings into an endless supply of aromatic, sun-loving herbs.
Rosemary is a Mediterranean staple known for its resilience and incredible scent. While it can be grown from seed, it is notoriously slow and difficult to germinate. Propagation from cuttings, however, is significantly faster and creates an exact “clone” of your favorite plant. Whether you want to gift herbs to friends or fill your garden with fragrance, here is your essential guide to multiplying your rosemary.
1. The “Goldilocks” Rule for Cuttings
The success of your new plant depends entirely on the stem you choose. You want a cutting that is 4–6 inches long from the tips of the plant.
Avoid the Old Wood: Stems at the base of the plant that are brown and “barky” are too old and will struggle to produce new roots.
Avoid the Very Soft Tips: The neon-green, floppy new growth at the very top is often too delicate and prone to wilting.
The Sweet Spot: Look for semi-hardwood—stems that are still green and flexible but feel firm and “snappy” when you bend them.
2. Prepare Your “Starter” Stems
Once you’ve snipped your stems at a 45-degree angle (which increases the surface area for water absorption), you need to prep them for life as a new plant.
Strip the Bottom: Gently pull off the needles from the bottom 2 inches of the stem. You want a bare “stalk” that can sit in water or soil without rotting.
The Cinnamon Trick: If you are planting directly into a rooting medium, dip the bottom tip in a little bit of cinnamon. It acts as a natural anti-fungal agent to prevent the stem from rotting before it can grow roots.
3. Choose Your Path: Water vs. Soil
There are two main ways to root your rosemary, and both work beautifully:
The Water Method: Place your prepped stems in a small glass of fresh water. Make sure no leaves are submerged. Place the glass on a sunny windowsill and change the water every single day. Seeing the white roots sprout through the glass is incredibly satisfying!
The Sand/Soil Method: Rosemary hates “wet feet,” so use a very well-draining medium like coarse sand or a mix of perlite and peat. Poke a hole with a pencil, tuck the stem in, and keep it moist but never soggy.
4. Humidity and Light
Rosemary cuttings need a “spa-like” environment to thrive while they don’t have roots to drink with.
Indirect Light: Keep them in a warm spot with plenty of light, but avoid harsh, direct midday sun, which can “cook” the unrooted stems.
The Humidity Tent: If your house is dry, loosely place a clear plastic bag over your soil-based cuttings to trap moisture. Just be sure to poke a few holes for airflow to prevent mold.
5. The “Tug Test” and Transplanting
Rooting usually takes anywhere from 4 to 8 weeks. How do you know if it’s working?
In Water: Wait until the roots are at least 1–2 inches long before moving to a pot.
In Soil: Give the plant a very gentle “tug.” If you feel resistance, it means the roots have gripped the soil and the plant is ready to be moved into its permanent home.
Pro-Tip: Match Your Climate
One of the best reasons to propagate a local rosemary bush (from your own yard or a neighbor’s) is that the plant is already proven to survive in your specific weather conditions. By “cloning” that specific plant, you are ensuring your new babies have the best possible genetics for your climate.