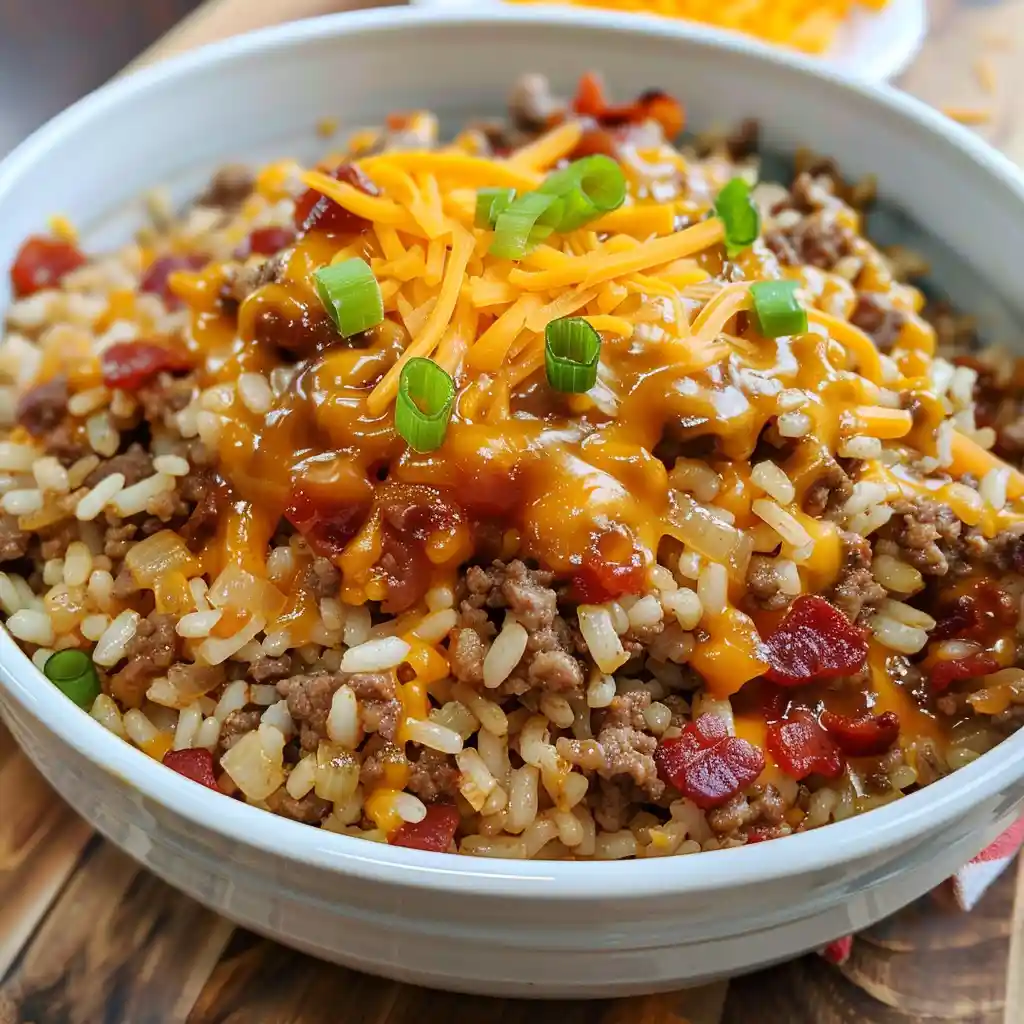
When the beloved flavors of a classic American bacon cheeseburger meet the convenience of a hearty rice dish, the result is Bacon Cheeseburger Rice – a meal that transforms busy weeknight dinners into something absolutely extraordinary. This innovative recipe takes all the indulgent elements of your favorite burger and combines them into one satisfying skillet that’s ready in under 30 minutes. Perfect for feeding hungry families, meal prep enthusiasts, or when you want to deliver maximum comfort food impact with minimal effort, this dish proves that sometimes the best innovations come from reimagining familiar favorites in completely new ways.
The Art of One-Pan Comfort Food Innovation
What makes this bacon cheeseburger rice so remarkable is its ingenious ability to capture every essential element of a classic burger experience in a single, cohesive dish. The seasoned ground beef provides the hearty protein foundation, while the incorporation of ketchup, mustard, and tomato sauce creates that distinctive burger sauce flavor that permeates every grain of rice. The result is a meal that’s both familiar and surprising, delivering all the satisfaction of a bacon cheeseburger without the mess of assembly or the need for multiple cooking surfaces.
This recipe also demonstrates the beauty of layered flavor building that maximizes both taste and convenience. The strategic addition of cheese in two stages – mixed throughout and melted on top – ensures every bite delivers that essential cheesy goodness, while the bacon adds the perfect smoky, salty finish that ties everything together. The final result is a dish that’s as Instagram-worthy as it is delicious, proving that comfort food can be both practical and impressive.
Essential Ingredients for Success
The Protein Foundation:
- 1 pound ground beef (80/20 blend)
- ½ medium yellow onion, diced
- 1 tablespoon fresh garlic, minced
- 1 teaspoon seasoned salt
The Flavor Building System:
- 8 ounces tomato sauce
- ¼ cup ketchup
- 1 tablespoon yellow mustard
- 2 cups beef broth
The Carbohydrate Base:
- 2 cups instant rice (like Minute Rice)
The Indulgent Finishing Elements:
- 1 cup cooked bacon, chopped
- 1 cup sharp cheddar cheese, shredded
Step-by-Step Preparation Guide
Phase 1: Building the Protein Foundation
Meat and Onion Preparation: Begin by heating a large skillet over medium-high heat. Add the ground beef and diced onion to the hot pan, cooking for 6-8 minutes while breaking up the meat with a spatula. The key here is achieving proper browning – resist the urge to constantly stir, allowing the meat to develop a good sear before breaking it apart. Continue cooking until no pink remains and the onions are softened and translucent.
Aromatic Integration: Stir in the minced garlic and cook for exactly 1 minute until fragrant. This brief cooking time is crucial – it allows the garlic to release its essential oils and develop flavor without burning, which would create bitter notes in the finished dish.
Fat Management and Seasoning: Drain off any excess grease from the pan to prevent the rice from becoming oily. This step is essential for achieving the proper texture in the final dish. Season the meat mixture with seasoned salt, distributing it evenly throughout the mixture.
Phase 2: Flavor Development and Rice Integration
Sauce Incorporation: Add the tomato sauce, ketchup, yellow mustard, instant rice, and beef broth to the skillet. The order of addition matters here – the sauces should be added first to coat the meat, followed by the rice and broth. Stir everything together until well combined, ensuring the rice is evenly distributed throughout the mixture and fully coated with the sauce mixture.
Gentle Cooking Process: Bring the mixture to a gentle simmer – not a rolling boil, which can make the rice mushy. Cook for 2-3 minutes, stirring occasionally to prevent sticking. The rice should absorb the liquid while maintaining its texture. The mixture is ready when the broth is absorbed and the rice is tender but still has a slight bite.
Phase 3: The Cheese and Bacon Finish
First Cheese Integration: Remove the skillet from heat and immediately stir in ½ cup of the shredded cheese and ½ cup of the chopped bacon. The residual heat will melt the cheese, creating a creamy consistency that binds the entire dish together. Stir until the cheese is completely melted and incorporated.
Final Presentation Layer: Sprinkle the remaining cheese and bacon over the top of the rice mixture, creating an attractive and appetizing presentation. Cover the skillet with a tight-fitting lid and let it sit for 2-3 minutes. This resting period allows the steam to melt the cheese on top while keeping the rice from overcooking.
Service Preparation: Remove the lid and serve immediately while the cheese is still molten and the dish is at its peak temperature. The contrast between the creamy melted cheese and the textured rice creates the perfect eating experience.
Professional Tips for Perfect Results
Meat Preparation Excellence
The 80/20 ground beef blend is crucial for this recipe’s success. The fat content provides flavor and moisture, while the leaner portion ensures the meat doesn’t become greasy. When browning, allow the meat to develop a good sear before breaking it up – this caramelization adds depth and complexity to the overall flavor profile.
Rice Cooking Mastery
Instant rice is specifically chosen for its quick cooking time and ability to absorb flavors. The key to perfect rice texture is maintaining a gentle simmer rather than a vigorous boil. This prevents the grains from becoming mushy while ensuring even cooking throughout. The rice should be tender but still maintain its individual grain structure.
Cheese Selection and Technique
Sharp cheddar cheese is essential for cutting through the richness of the beef and bacon. The two-stage cheese addition serves different purposes: the first addition creates creaminess throughout the dish, while the second creates visual appeal and provides that satisfying cheese pull when served.
Temperature and Timing Control
The resting period with the lid on is crucial for achieving the perfect melted cheese topping. The residual heat and steam create the ideal environment for melting without overcooking the rice. Don’t skip this step – it’s what transforms a good dish into a great one.
Serving Suggestions and Variations
This bacon cheeseburger rice is substantial enough to serve as a complete meal, but it pairs beautifully with simple sides that complement rather than compete with its bold flavors. The dish serves 4-6 people generously, making it perfect for families or meal prep.
Classic Accompaniments:
- Crisp green salad with ranch dressing
- Steamed broccoli or green beans
- Dill pickle spears (staying true to the burger theme)
- A dollop of sour cream and chopped green onions
Creative Variations:
- Turkey Cheeseburger Rice: Substitute ground turkey for a lighter option
- Mushroom Swiss Version: Add sautéed mushrooms and use Swiss cheese instead of cheddar
- Spicy Southwest Style: Include diced jalapeños, use pepper jack cheese, and add a dash of hot sauce
- Veggie-Loaded: Add diced bell peppers, corn, or zucchini for extra nutrition and color
- Double Cheese Deluxe: Use a combination of cheddar and American cheese for ultra-rich results
Flavor Enhancements:
- Add Worcestershire sauce for umami depth
- Include smoked paprika for additional smoky flavor
- Stir in fresh herbs like parsley or chives before serving
Make-Ahead and Storage Options
This recipe is excellent for meal prep and busy weeknight planning. The complete dish can be prepared up to 2 days in advance and stored in the refrigerator, making it perfect for families with hectic schedules or anyone who enjoys having delicious meals ready to reheat.
Meal Prep Strategies:
Prepare the complete dish and divide into individual portions for easy reheating throughout the week. The flavors actually improve after a day in the refrigerator as the seasonings have time to meld together. Store in airtight containers to maintain freshness and prevent the rice from drying out.
Storage Guidelines:
Leftovers keep well in the refrigerator for up to 3 days in airtight containers. For longer storage, the dish can be frozen for up to 3 months, though the texture of the rice may change slightly upon thawing. Divide into single-serving portions before freezing for maximum convenience.
Reheating Methods:
When reheating, add a splash of beef broth or water to restore moisture, and heat gently in a covered skillet over medium-low heat. This method preserves the rice texture and prevents the cheese from becoming rubbery. The dish can also be reheated in the microwave, though the stovetop method yields superior results.
Frequently Asked Questions
Q: Can I use regular long-grain rice instead of instant rice? A: While instant rice works best for this recipe’s timing and texture, you can use regular rice. Cook it separately according to package directions, then add it to the meat mixture in the final steps. This will add about 20 minutes to your total cooking time.
Q: How can I make this recipe healthier without sacrificing flavor? A: Use lean ground turkey or chicken (93/7 blend), reduce the cheese by half, use turkey bacon, and add extra vegetables like diced bell peppers, zucchini, or spinach. You can also use brown rice, though you’ll need to cook it separately first.
Q: Can I make this recipe in advance for a party? A: Absolutely! The complete dish can be prepared up to 2 days ahead. Store covered in the refrigerator and reheat gently, adding a splash of broth if needed. You can also prepare it in a slow cooker on warm for serving at parties.
Q: What if I don’t have seasoned salt? A: You can substitute with regular salt and add extra seasonings like garlic powder, onion powder, and paprika to taste. Use about ¾ teaspoon regular salt plus ¼ teaspoon each of garlic powder and onion powder.
Q: Can I double this recipe for a larger crowd? A: Yes! Use a larger skillet or Dutch oven, or divide between two skillets. The cooking times remain the same, but you may need an extra minute or two for the larger quantity to heat through evenly.
Q: What’s the best way to reheat leftovers? A: Add a splash of beef broth or water to prevent drying out, then reheat in a covered skillet over medium-low heat, stirring occasionally. This method preserves the texture better than microwave reheating.
Q: Can I make this recipe dairy-free? A: Yes, substitute the cheese with dairy-free alternatives and ensure your bacon is dairy-free. The dish will still be delicious, though the texture will be slightly different without the melted cheese element.
Q: How do I prevent the rice from becoming mushy? A: Use instant rice as specified, maintain a gentle simmer rather than a rolling boil, and don’t overcook. The rice should be tender but still have individual grain structure when done.
Q: Can I add vegetables to this recipe? A: Absolutely! Diced bell peppers, corn, peas, or zucchini work well. Add heartier vegetables like bell peppers with the onions, and more delicate vegetables like peas in the final few minutes of cooking.
Q: What’s the secret to getting the cheese to melt perfectly on top? A: The key is removing the pan from heat before adding the final cheese layer, then covering with a tight-fitting lid. The residual heat and steam create the perfect melting environment without overcooking the rice.
Print
Bacon Cheeseburger Rice
This Bacon Cheeseburger Rice transforms America’s favorite burger into a hearty, one-pan meal that brings all the classic flavors in a comforting rice dish. Perfect for busy weeknights when you’re craving the taste of a cheeseburger but want something more substantial and easier to serve.
- Total Time: 35 minutes
- Yield: 6 servings 1x
Ingredients
- 1 pound ground beef (80/20 blend)
- ½ medium yellow onion, diced
- 1 tablespoon fresh garlic, minced
- 1 teaspoon seasoned salt
- 8 ounces tomato sauce
- ¼ cup ketchup
- 1 tablespoon yellow mustard
- 2 cups instant rice (like Minute Rice)
- 2 cups beef broth
- 1 cup cooked bacon, chopped
- 1 cup sharp cheddar cheese, shredded
Instructions
- Brown the Meat and Onions: Heat a large skillet over medium-high heat. Add ground beef and diced onion, cooking for 6-8 minutes while breaking up the meat with a spatula until no pink remains and onions are softened. This creates the savory foundation of your dish, developing rich flavors as the beef caramelizes and the onions turn translucent.
- Add Aromatics: Stir in minced garlic and cook for 1 minute until fragrant. Drain off any excess grease, then season the mixture with seasoned salt. The garlic adds depth while removing excess fat ensures the dish isn’t greasy, and the seasoned salt brings all the flavors together.
- Combine Sauce and Rice: Add tomato sauce, ketchup, yellow mustard, instant rice, and beef broth to the skillet. Stir everything together until well combined. These ingredients create the classic cheeseburger flavor profile while providing enough liquid for the rice to cook perfectly.
- Simmer Until Absorbed: Bring the mixture to a gentle simmer and cook for 2-3 minutes, stirring occasionally, until the broth is absorbed and the rice is tender. The instant rice will quickly soak up the flavorful liquid, becoming tender and infused with all the savory elements.
- Incorporate Cheese and Bacon: Remove from heat and stir in ½ cup of the shredded cheese and ½ cup of the chopped bacon until the cheese melts into the rice. This step ensures the cheesy flavor is distributed throughout the dish while saving some toppings for a gorgeous finish.
- Melt Remaining Toppings: Sprinkle the remaining cheese and bacon over the top of the rice mixture. Cover the skillet and let it sit for 2-3 minutes to allow the steam to melt the cheese on top. This creates that irresistible cheesy pull when serving.
- Serve Hot: Remove the lid and serve immediately while hot and cheesy. This tastes just like a bacon cheeseburger in rice form! The dish is at its peak when freshly made, with all the components still warm and the cheese perfectly melted.
Notes
- For a healthier version, you can substitute ground turkey or chicken for the beef and use brown instant rice.
- Add diced pickles, tomatoes, or lettuce as garnish when serving for an even more authentic cheeseburger experience.
- This dish reheats well for leftovers – just add a splash of broth if it seems dry.
- Consider adding a few dashes of Worcestershire sauce for extra umami flavor.
- For a spicy version, add diced jalapeños or a dash of hot sauce.
- Prep Time: 15 minutes
- Cook Time: 20 minutes
- Category: Main-course
- Method: One Pot & One Pan
- Cuisine: American
Nutrition
- Serving Size: 1 cup
- Calories: 450
- Sugar: 5g
- Sodium: 850mg
- Fat: 25g
- Saturated Fat: 11g
- Unsaturated Fat: 12g
- Trans Fat: 0g
- Carbohydrates: 32g
- Fiber: 1g
- Protein: 24g
- Cholesterol: 80mg