
I still remember the first time I served this coconut cream pie at our family’s summer gathering. My aunt, who rarely gets excited about desserts, took one bite and declared it was like “vacation on a plate.” That’s when I knew this recipe was something special. Growing up in a home where cooking was our love language, I learned early that the simplest recipes often create the most profound connections around the table.
This no-bake coconut cream pie has become my go-to when I need something impressive but don’t want to spend hours in the kitchen. On warm summer evenings when turning on the oven feels like a punishment, or busy holidays when stovetop space is precious, this dessert never fails to deliver that perfect sweet ending to a meal. The best part? It comes together in minutes, though no one would ever guess.
Why This Recipe Found a Permanent Home in My Collection
The beauty of this coconut cream pie lies in its beautiful balance of textures. The silky coconut filling gets its structure from instant pudding mix (a secret ingredient I’m not ashamed to embrace), while the real coconut adds that authentic tropical flavor and slight chew that makes each bite interesting.
I’ve tested countless variations over the years, and this version consistently earns the most compliments when I serve it at gatherings. Last Christmas, I placed it alongside my usual lineup of more complex baked desserts, and this was the first to disappear – the empty pie plate scraped clean with not a crumb remaining.
What I love most is how this recipe meets people where they are. Whether you’re a novice in the kitchen or someone who bakes weekly, the results are consistently delightful. It’s exactly the kind of recipe that embodies what I believe about cooking: extraordinary results don’t require extraordinary effort.
What You’ll Need
Pre-made 9-inch crust: I typically use graham cracker, but during my recipe testing phase, I discovered that a Golden Oreo crust creates a beautiful flavor complement to the coconut. Use whatever brings you joy – both work wonderfully.
Instant coconut pudding mix: The backbone of our filling. I’ve tried making this from scratch, but honestly, the convenience and consistent texture of the instant pudding won me over after multiple test batches.
Whole milk: The fat content here matters for a proper set. I’ve tried with 2% in a pinch, but the filling wasn’t quite as luxurious.
Sweetened shredded coconut: This brings that authentic tropical flavor and delightful texture. I’ve experimented with unsweetened, but the sweetened variety melds better with the pudding.
Whipped topping: Cool Whip is convenient, but I often use homemade whipped cream stabilized with a bit of cream cheese when I have the extra few minutes.
Toasted coconut or crushed cookies: For the topping, either option adds a wonderful textural contrast. When photographing this pie by my dining room window, I’ve found the toasted coconut catches the light beautifully.
Let’s Get Assembling
Creating the Dreamy Filling
In a large mixing bowl, combine your coconut pudding mix with cold whole milk. I’ve found that a whisk works perfectly fine, though sometimes I use my hand mixer when I want to speed things along. The mixture will begin to thicken within about 2-3 minutes – you’ll feel the resistance against your whisk increase.
Once your pudding has thickened, gently fold in the sweetened shredded coconut. I emphasize “gently” here because keeping air in the mixture results in a lighter, more delicate texture. This is something I learned the hard way after making several denser versions when I first developed this recipe.
Building Your Masterpiece
Pour this coconut-studded mixture into your waiting pie crust. Use a silicone spatula to smooth the surface – I like to create subtle swoops and swirls rather than a perfectly flat top. The little peaks and valleys will look beautiful once we add the topping.
At this stage, the filling might still seem a bit soft, almost pudding-like. Don’t worry – this is exactly how it should look. The first time I made this, I panicked at this stage thinking I’d done something wrong, but patience reveals the magic.
The Waiting Game
Cover your pie loosely with plastic wrap or foil and place it in the refrigerator. This is where transformation happens. While the minimum chill time is 2-3 hours, I almost always make this pie the evening before I plan to serve it. There’s something about that overnight rest that allows the flavors to meld beautifully.
When my sister-in-law asked for this recipe last summer, this was the tip I emphasized most – give it that full overnight chill if you can. The difference is subtle but noticeable.
The Finishing Touch
Once your pie has set completely, spread your whipped topping across the surface. I usually create some decorative swirls with the back of a spoon, nothing fancy but still pretty. For special occasions like the birthday dinner I hosted last month, I’ve transferred the whipped topping to a piping bag with a star tip and created a more elaborate design.
Finally, sprinkle your toasted coconut or crushed cookies across the top. Toasting coconut is one of those small steps that delivers outsized results – just a few minutes in a dry skillet until golden and fragrant transforms the flavor completely. Just watch it carefully; I’ve turned my back for a moment too long more times than I’d like to admit and ended up with charred coconut instead!
Make It Your Own
Over the years of making this pie for different occasions, I’ve developed some variations that might inspire you:
When I hosted a tropical-themed dinner party last summer, I added a thin layer of sliced fresh bananas between the crust and coconut filling – the combination was magical and reminiscent of a piña colada.
For my chocolate-loving husband’s birthday, I used a chocolate cookie crust and sprinkled mini chocolate chips into the filling. The coconut-chocolate pairing was absolutely divine.
During the holidays, I sometimes add a teaspoon of rum extract to the filling and garnish with crushed peppermint candies instead of toasted coconut for a festive twist that never fails to impress.
What I’ve Learned Along the Way
After making this pie countless times, I’ve picked up a few tricks that make all the difference:
The temperature of your milk matters – use it straight from the refrigerator. Room temperature milk won’t set the pudding properly, something I discovered during an unfortunate potluck contribution.
If you’re making your own whipped cream instead of using prepared whipped topping, add 2 ounces of softened cream cheese to help it hold its shape longer. I learned this after my first attempt at bringing this pie to an outdoor gathering resulted in sad, melted cream.
When toasting coconut, use a wider skillet rather than a small one. The increased surface area allows for more even browning and lets you see what’s happening. I’ve burned more batches than I care to admit when using a small pan.
For the cleanest slices, dip your knife in hot water and wipe it clean between cuts. This simple step transformed my messy-looking slices into the photo-worthy pieces you see on the website.
Frequently Asked Questions
Can I use coconut milk instead of whole milk? → I’ve tested this, and while it does work, the pie doesn’t set quite as firmly. If you want to use coconut milk, replace just half the whole milk for better results.
My pie didn’t set properly. What happened? → The most common culprit is not chilling long enough. Give it at least 4 hours, preferably overnight. Also, make sure you’re using instant pudding, not the cook-and-serve variety.
Can I make this pie dairy-free? → Yes! I’ve made this for my lactose-intolerant cousin using almond milk and dairy-free whipped topping. The texture is slightly different but still delicious.
How far in advance can I make this? → This pie keeps beautifully for up to 3 days in the refrigerator. I often make it two days ahead for gatherings, adding the whipped topping and garnish just before serving.
I can’t find coconut pudding mix. What can I substitute? → Vanilla pudding works wonderfully with an additional teaspoon of coconut extract added to the mixture. I’ve done this many times when my local store was out of coconut pudding.
This no-bake coconut cream pie has become more than just a dessert in my home – it’s a solution for busy days, a crowd-pleaser for gatherings, and a reminder that sometimes the simplest recipes create the most meaningful moments around the table. I hope it brings the same joy to your kitchen.
Print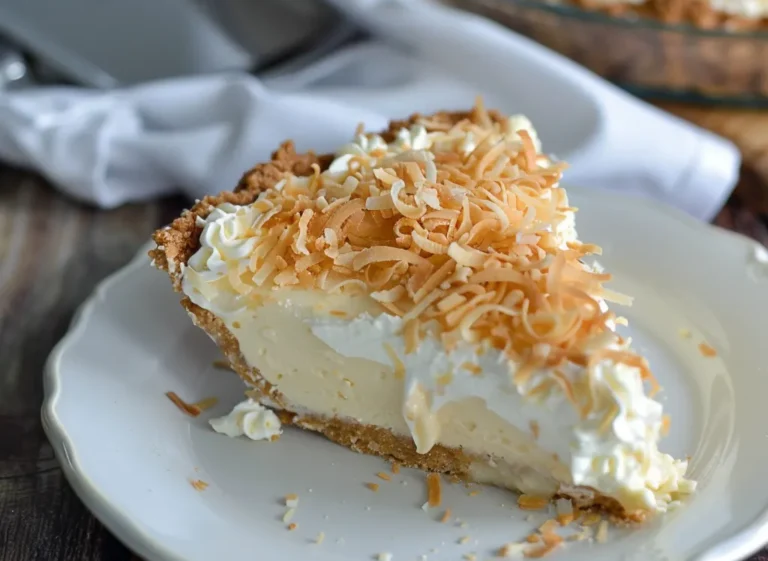
No-Bake Coconut Cream Pie
A dreamy, cloud-like coconut pie that comes together without turning on the oven. Creamy coconut pudding nestled in a crisp crust, topped with fluffy whipped cream and toasted coconut for the perfect tropical dessert any time of year.
- Total Time: 3 hours 15 minutes (including chilling time)
- Yield: 8–10 servings 1x
Ingredients
For the Pie:
- 1 pre-made 9-inch crust (graham cracker or Golden Oreo crust)
- 2 boxes (3.4 oz each) of instant coconut pudding mix
- 3½ cups cold whole milk
- 2 cups sweetened shredded coconut
- 1–2 cups whipped topping (like Cool Whip or stabilized whipped cream)
For the Topping:
- 1 cup toasted coconut or crushed cookies (Golden Oreos, vanilla wafers, or graham crackers)
Instructions
- Make the Filling: In a large mixing bowl, combine the instant coconut pudding mix with cold whole milk. Whisk with an electric hand mixer for 2-3 minutes until the mixture thickens. Gently fold in the sweetened shredded coconut using a rubber spatula, maintaining a light and fluffy texture throughout the mixture.
- Assemble the Pie: Pour the coconut pudding mixture into your pre-made pie crust. Use a spatula to carefully spread it evenly across the base, creating a smooth surface. The filling may still appear soft at this stage, but it will set properly during chilling.
- Chill the Pie: Cover the pie loosely with plastic wrap or foil and refrigerate for at least 2-3 hours, preferably overnight. This crucial chilling time allows the pudding to set completely and the coconut flavors to fully develop and meld together into a cohesive custard.
- Add the Whipped Topping: Once the pie is fully set, remove from the refrigerator and spread the whipped topping evenly over the surface. For a decorative finish, create swirls with the back of a spoon or use a piping bag with a star tip for a more elegant presentation.
- Decorate and Serve: Sprinkle the toasted coconut or crushed cookies over the whipped topping layer. To toast coconut, heat it in a dry skillet over medium heat for 3-5 minutes, stirring constantly until golden brown and fragrant. Slice the finished pie into 8-10 portions and serve chilled.
Notes
- For extra coconut flavor, add 1/2 teaspoon of coconut extract to the pudding mixture.
- The pie can be made up to 2 days in advance and kept refrigerated.
- If you prefer homemade whipped cream over store-bought, whip 2 cups of heavy cream with 1/4 cup powdered sugar and 1 teaspoon vanilla until stiff peaks form.
- For a more sophisticated flavor, try using unsweetened coconut and adding a tablespoon of rum to the filling.
- Prep Time: 15 minutes
- Cook Time: 0 minutes
- Category: Desserts
- Method: No-cook
- Cuisine: American
- Diet: Vegetarian
Nutrition
- Serving Size: 1 slice (1/8 of pie)
- Calories: 380
- Sugar: 32g
- Sodium: 350mg
- Fat: 21g
- Saturated Fat: 15g
- Unsaturated Fat: 5g
- Trans Fat: 0g
- Carbohydrates: 42g
- Fiber: 2g
- Protein: 5g
- Cholesterol: 10mg
Related posts:
 Garlic Bread Grilled Cheese
 Strawberry Eclair Cake
 Slow Cooker Spinach and Mushroom Pasta Alfredo
 Slow Cooker Amish Beef and Potato Casserole
 Cheesy Potato Burritos with Ground Beef and Crispy Tater Tots
 Creamy One Pot Smoked Sausage Pasta
 Air Fryer Honey Butter Garlic Chicken Tenders
 Bell Pepper Taco Bites