
This extraordinary Cheesecake Fruit Salad Roll Ups recipe represents the pinnacle of American party dessert innovation and tortilla-wrap artistry, masterfully combining the creamy, buttery perfection of whipped cream cheese filling with the colorful, fresh abundance of five-fruit medley through revolutionary cinnamon-sugar-coated tortilla methodology that creates an exceptional entertaining experience celebrating both traditional American cheesecake heritage and contemporary fruit-forward sophistication. The genius of this remarkable creation lies in its sophisticated understanding of instant pudding stabilization technique, strategic whipped cream folding methodology, and balanced cinnamon-sugar exterior coating, where impressive accessible ingredients meet bakery-quality results within a harmonious composition that delivers brunch-party-worthy outcomes through careful roll-and-coat methods, embodying both classic American cheesecake traditions and modern fruit salad innovation in every perfectly crispy-coated, fruit-studded, satisfaction-defining slice that transforms basic ingredients into extraordinary celebration experiences.
The Art of Cheesecake Fruit Roll Construction and Instant-Pudding Stabilization Mastery
Cheesecake Fruit Salad Roll Ups represent the evolution of traditional American pinwheel roll cuisine, where classic cream-cheese-spread methodology meets modern fruit salad integration technique to create dessert masterpieces that celebrate the fundamental principles of proper cheesecake filling while delivering the beloved fresh fruit flavors and impressive portable convenience that define exceptional party dessert excellence. Born from the desire to create visually stunning party foods through strategic five-fruit color palette, expert instant pudding filling-stabilization methodology, and the transformative power of the cream cheese-fruit-cinnamon sugar trinity, this recipe embodies the philosophy of “accessible patisserie elegance” – where beloved traditional cheesecake is simplified through tortilla format and thoughtful cinnamon-sugar exterior enhancement that honor both classic American heritage and contemporary fresh-fruit requirements. The roll ups’ transformation from separate components to unified, golden-coated perfection demonstrates how proper understanding of pudding-powder thickening technique, raspberry color-bleed prevention, and optimal 30-minute chilling timing can create consistently extraordinary results that satisfy both traditional cheesecake enthusiasts and modern fruit-dessert connoisseurs.
Understanding the Science of Instant-Pudding Starch-Thickening Filling-Stabilization and Whipped-Cream Air-Retention Folding Mastery
The success of this Cheesecake Fruit Salad Roll Ups recipe lies in the masterful orchestration of starch thickening, fat emulsification, and air retention that creates optimal creamy-yet-stable filling texture while maintaining fresh fruit integrity and achieving perfect cinnamon-sugar coating throughout the preparation process. The strategic instant vanilla pudding powder foundation provides essential filling stability and superior thick texture, where dry pudding powder absorbs moisture creating thickened filling, sugar-free variety reduces sweetness allowing fruit flavors prominence, and proper incorporation defines exceptional cheesecake roll character. The carefully executed whipped cream folding ensures optimal lightness and prevents dense heavy filling that creates rather than compromises bakery-quality results, while the expertly applied melted butter-cinnamon-sugar exterior provides signature crispy sweet coating and visual appeal that elevates the entire roll experience to patisserie sophistication and party-dessert perfection.
Ingredients (Makes Approximately 40-50 Slices)
Essential Whipped Cream Component:
- 1¼ cups (300ml) whipped cream — either store-bought prepared whipped cream OR make from scratch: ½ cup plus 2 tablespoons (150ml) chilled heavy whipping cream beaten with 2½ tablespoons (20g) powdered sugar until stiff peaks form, for light airy texture
Critical Cream Cheese Filling Base:
- ½ cup (113g/1 stick) unsalted butter, softened to room temperature, for rich creamy base
- 1½ cups (180g) powdered sugar, sifted if lumpy, for sweetness and structure
- 6 ounces (170g/¾ package) cream cheese, softened to room temperature, for tangy cheesecake character
- 1 teaspoon (5ml) vanilla extract, for aromatic depth
Essential Filling Stabilizer:
- 2 boxes (1 ounce/28g each, total 2 ounces/56g) sugar-free vanilla instant pudding mix (dry powder only—do not prepare according to package directions—use powder directly), for filling thickness and stability
Critical Five-Fruit Medley:
- ⅔ cup (approximately 3.5 ounces/100g) fresh blueberries, for blue-purple color and mild sweetness
- ⅔ cup (approximately 3.5 ounces/100g) fresh strawberries, small-diced into ¼-inch pieces, for red color and sweet-tangy flavor
- 3 small peaches (approximately 12 ounces/340g total), peeled and small-diced into ¼-inch pieces, for orange-yellow color and sweet stone fruit
- 2 kiwi (approximately 6 ounces/170g total), peeled and small-diced into ¼-inch pieces, for bright green color and tropical tang
- ½ cup (approximately 2.5 ounces/70g) fresh raspberries, sliced in half (set aside separately from other fruits—see technique note), for red color and delicate flavor
Essential Tortilla Components:
- 4-5 large flour tortillas (10-12 inch diameter—burrito size—room temperature for flexibility), for flexible roll wrapper
- 2-3 tablespoons (28-42g) unsalted butter, melted, for exterior brushing
Critical Cinnamon-Sugar Exterior Coating:
- ½ cup (100g) granulated sugar, for sweet coating
- 1 teaspoon (2.5g) ground cinnamon (or more to taste), for warm spice exterior
Optional Enhancement Elements:
- Additional fresh mint for garnish
- Honey drizzle for serving
- Additional fruit for platter decoration
- Lemon zest in filling for brightness
- Coconut flakes in fruit mixture for tropical variation
- Additional cinnamon in filling for warm spice
Essential Equipment Requirements:
- Large mixing bowl for cream cheese filling
- Electric mixer (handheld or stand) for beating
- Separate bowl for whipped cream (if making from scratch)
- Rubber spatula for folding
- Flat work surface for rolling tortillas
- Sharp knife for slicing
- Shallow bowl or plate for cinnamon-sugar coating
- Pastry brush for butter application
- Refrigerator for chilling mixture
Instructions
Professional Whipped Cream Preparation and Stiff-Peak Achievement:
If making homemade whipped cream: Place ½ cup plus 2 tablespoons chilled heavy whipping cream in cold mixing bowl (chilling bowl in freezer 10 minutes creates best results). Using electric mixer, beat cream on medium-high speed until soft peaks form (cream holds shape but tips curl when beaters lifted—approximately 2-3 minutes).
Add 2½ tablespoons powdered sugar and continue beating on medium-high speed until stiff peaks form (cream holds firm shape, tips stand straight when beaters lifted, cream no longer flows when bowl tilted—approximately 1-2 additional minutes).
Critical whipped cream principle: Stiff peaks provide structure maintaining lightness in finished filling. Under-whipped cream creates dense heavy filling.
Set prepared whipped cream aside (refrigerate if not using immediately).
If using store-bought whipped cream: Measure 1¼ cups from container and set aside.
Expert Cream Cheese Filling Preparation and Complete Creaming:
In large mixing bowl using electric mixer, combine ½ cup softened room-temperature unsalted butter, 6 ounces softened room-temperature cream cheese, 1 teaspoon vanilla extract, and 1½ cups powdered sugar.
Beat on medium-high speed for 3-4 minutes until mixture becomes completely smooth, light, fluffy, and pale in color—properly beaten should appear very smooth with no lumps, pale ivory color (lighter than original butter-yellow), and smell of vanilla and cream cheese.
Critical ingredient temperature: Both butter AND cream cheese must be room temperature. Cold creates lumps; too warm creates loose filling.
Add prepared whipped cream to cream cheese mixture. Using mixer on low speed or rubber spatula, mix until just combined and uniform—properly mixed should appear light, fluffy, increased in volume, and unified.
Strategic Fruit Folding and Color-Preservation Technique:
Critical raspberry management: Do not add raspberries with other fruits at this stage. Raspberries are very soft and will break apart when folded, tinting entire filling pink-red. Set raspberries aside for separate addition later.
To cream cheese-whipped cream mixture, add ⅔ cup blueberries, ⅔ cup small-diced strawberries, diced peaches from 3 small peaches, and small-diced kiwi from 2 kiwis. Using rubber spatula, gently fold fruits into filling using soft lifting-and-turning motion for approximately 30-45 seconds just until fruits distribute throughout—fold gently preventing crushing fruit releasing juice which creates colored streaks in filling.
Properly folded should show colorful fruit pieces distributed throughout cream cheese mixture, filling maintaining mostly white/ivory color (slight tinting from fruit juice is normal and beautiful), and no crushed fruit.
Critical Pudding Powder Addition and Filling Stabilization:
Add both boxes (2 ounces total dry powder) sugar-free vanilla instant pudding mix directly to fruit-cream cheese mixture as dry powder—do not prepare pudding according to package instructions—use dry powder only as thickening agent.
Using rubber spatula, stir pudding powder into filling for 30-45 seconds until distributing completely—properly incorporated should show pudding powder disappearing into mixture, filling beginning to thicken slightly from starch absorption, and no visible powder remaining.
Critical pudding powder principle: Dry pudding powder absorbs moisture from cream cheese and fruit creating thick stable filling. Prepared pudding would create liquid-thin unusable mixture.
Beautiful Chilling and Complete Mixture Firming:
Cover bowl with plastic wrap pressing directly against filling surface preventing skin formation. Transfer covered bowl to refrigerator.
Chill filling for minimum 30 minutes (1-2 hours preferred for best spreading consistency and maximum stability)—chilling allows pudding powder to fully absorb moisture, filling to firm to spreadable consistency, and flavors to meld.
Properly chilled should show filling thickened to firm spreadable consistency (like thick frosting), flavors melded creating unified taste, and ready for tortilla spreading.
Strategic Cinnamon-Sugar Mixture Preparation:
In shallow bowl or on flat plate, combine ½ cup granulated sugar and 1 teaspoon ground cinnamon (or more to taste). Stir together until combining completely creating uniform cinnamon-sugar mixture—properly mixed should appear uniform with cinnamon distributed throughout sugar, no cinnamon clumps.
Set cinnamon-sugar mixture aside for coating.
Melt 2-3 tablespoons unsalted butter in microwave-safe bowl (20-30 seconds). Set melted butter aside with pastry brush.
Expert Tortilla Spreading and Fruit Distribution:
Lay 1 large room-temperature tortilla (10-12 inch diameter) flat on clean work surface. Using offset spatula or back of spoon, spread approximately ¼-⅕ of chilled filling mixture (approximately ¾-1 cup per tortilla) evenly across entire tortilla surface leaving ½-inch clean border along one edge (for sealing)—properly spread should show filling covering tortilla in relatively even layer approximately ¼ inch thick.
Once filling spread, scatter reserved halved raspberries across filling surface of each tortilla—adding raspberries separately prevents color bleeding through entire filling.
Important spreading note: Room-temperature tortillas are essential. Cold tortillas crack when rolled. If tortillas seem stiff, warm briefly in microwave 10 seconds creating flexibility.
Repeat spreading and raspberry scattering with remaining 3-4 tortillas.
Perfect Tight Rolling and Cylinder Formation:
Starting from edge opposite clean border, roll tortilla tightly over cream cheese-fruit filling maintaining firm even pressure throughout rolling—tight rolling prevents filling from escaping and creates proper pinwheel appearance when sliced.
When reaching clean border edge, press firmly to seal using cream cheese filling as natural adhesive.
Repeat rolling with remaining filled tortillas creating 4-5 tight cylinders.
Critical Cinnamon-Sugar Coating and Exterior Preparation:
Working with one rolled tortilla at a time, use pastry brush to brush exterior surface of rolled tortilla generously with melted butter creating complete coverage—butter helps cinnamon sugar adhere and creates slight crispness.
Immediately roll butter-brushed tortilla cylinder in shallow cinnamon-sugar mixture, turning to coat all exterior surfaces completely—cinnamon sugar should adhere to butter coating entire tortilla exterior.
Properly coated should show cinnamon sugar covering entire exterior creating aromatic sweet spiced coating, tortilla appearing golden-brown from cinnamon, and smelling of warm cinnamon.
Repeat buttering and cinnamon-sugar coating with remaining rolled tortillas.
Expert Slicing and Immediate Service:
Using sharp knife, slice each cinnamon-sugar-coated filled tortilla cylinder into ⅔-¾ inch thick rounds creating individual pinwheel slices—properly sliced should show clean cross-sections revealing swirl of tortilla wrapper, colorful cream cheese-fruit filling, and visible fruit pieces creating beautiful pinwheel appearance.
Important serving principle: Serve immediately after slicing. Cinnamon sugar exterior and fresh fruit filling are best when freshly cut. Extended sitting creates moisture seeping making exterior soggy.
Arrange cut pinwheels on serving platter cut-side up showcasing colorful fruit-filled cross-section with visible blueberries, strawberries, peaches, kiwi, and raspberries throughout cream cheese filling creating beautiful rainbow presentation.
Each slice should deliver warm cinnamon-sugar coated tortilla exterior, creamy vanilla cheesecake filling, colorful fresh fruit medley throughout, and complete dessert roll experience.
Professional Tips for Perfect Results
Keep Raspberries Separate: Folding raspberries with other fruits causes color bleeding tinting entire filling. Add separately when spreading on tortillas.
Use Dry Pudding Powder: Never prepare pudding according to package. Dry powder thickens filling properly. Prepared pudding creates unusable liquid.
Room-Temp Tortillas: Cold tortillas crack when rolled. Room temperature creates proper flexibility.
Chill Filling Minimum 30 Minutes: Chilling firms filling for proper spreading consistency. Warm filling creates runny messy spreading.
Roll Tightly: Firm rolling prevents filling escape and creates proper pinwheel. Loose rolling creates fallen-apart slices.
Serve Immediately: Freshly sliced rolls have best texture. Extended sitting creates soggy exterior from moisture migration.
Use Room-Temp Butter and Cream Cheese: Both must be soft for smooth lump-free filling. Cold creates lumps preventing proper creaming.
Brush Butter Generously: Complete butter coverage ensures cinnamon sugar adhesion. Sparse brushing creates patchy coating.
Troubleshooting Common Issues
Pink Filling: Results from folding raspberries with other fruits. Set aside and scatter individually when spreading.
Loose Watery Filling: Indicates insufficient chilling or not using pudding powder. Chill minimum 30 minutes and use dry pudding powder.
Cracked Tortillas: Caused by cold tortillas. Use room-temperature tortillas or warm briefly 10 seconds in microwave.
Cinnamon Sugar Not Sticking: Results from insufficient butter. Brush generously ensuring complete coverage before rolling in mixture.
Filling Oozing Out: Indicates too-thick filling layer or loose rolling. Spread moderately and roll very tightly.
Lumpy Filling: Caused by cold butter or cream cheese. Use completely room-temperature ingredients beaten smooth.
Soggy Exterior: Results from extended sitting after slicing. Coat and slice immediately before serving.
Creative Variations and Adaptations
While the classic five-fruit version represents party roll perfection, this recipe provides foundation for variations:
Tropical: Use mango, pineapple, coconut for tropical variation.
Berry Only: Use all berries (strawberries, blueberries, raspberries, blackberries) for all-berry version.
Winter Citrus: Use mandarin segments, pomegranate seeds, kiwi for winter variation.
Chocolate: Add 2 tablespoons cocoa powder to filling, use chocolate graham crumbs for coating.
Nutella Swirl: Swirl Nutella through filling before rolling for chocolate-hazelnut variation.
Lemon-Blueberry: Add lemon zest and juice to filling, use only blueberries for simplified version.
Coconut: Add shredded coconut to filling and cinnamon sugar coating for tropical variation.
Storage Guidelines
Cheesecake Fruit Salad Roll Ups achieve optimal texture when served immediately after slicing, showcasing perfect balance between crispy cinnamon exterior and creamy fruit filling throughout. Assembled unsliced rolls can be stored wrapped tightly in plastic wrap refrigerated for up to 24 hours before slicing and coating—coat with butter and cinnamon sugar immediately before slicing and serving. Once sliced and coated, best consumed within 2-3 hours. Store leftover slices in airtight container refrigerated for up to 2 days (exterior softens from moisture but remains delicious). Not recommended for freezing.
Nutritional Information and Party Value
This indulgent festive treat provides party nutrition with approximately 120-150 calories per slice, moderate protein from cream cheese, moderate carbohydrates from tortilla and sugar, moderate fat from butter and cream cheese, vitamin C from fresh fruits, antioxidants from berries, and complete crowd-pleasing experience suitable for brunch parties, baby showers, graduation celebrations, potlucks, holiday gatherings, and whenever impressive fruit-filled dessert rolls and cheesecake flavors are desired. The individual slice format creates perfect portion control while colorful fruit medley ensures visual appeal celebrating American party dessert culture and fresh fruit innovation.
Frequently Asked Questions
Q: Why add pudding powder dry? A: Dry powder absorbs moisture from filling creating thick stable consistency. Prepared liquid pudding makes filling impossibly thin and runny.
Q: Can I use regular vanilla pudding mix? A: Yes, regular (not sugar-free) works but creates sweeter filling. Sugar-free allows fresh fruit flavors to shine.
Q: Why separate raspberries? A: Raspberries are very delicate and bleed color intensely when folded staining entire filling pink. Scattered separately preserves color integrity.
Q: Can I make these ahead? A: Yes, assemble unsliced rolls up to 24 hours ahead refrigerated. Coat with butter-cinnamon sugar and slice immediately before serving.
Q: What if filling is too soft? A: Chill longer—1-2 hours creates firmer consistency than minimum 30 minutes. Pudding powder needs time to fully absorb moisture.
Q: Can I use different fruits? A: Yes, any firm fresh fruit works. Avoid very watery fruits (watermelon) which release too much liquid. Frozen fruits not recommended.
Q: Why use room-temperature tortillas? A: Cold tortillas crack and tear when rolling. Room temperature creates proper pliability preventing cracking during rolling.
Q: Can I skip the cinnamon sugar coating? A: Yes, rolls delicious without coating. Cinnamon sugar adds signature sweet spiced exterior and visual appeal but optional.
This Cheesecake Fruit Salad Roll Ups recipe represents the perfect embodiment of American party dessert excellence, delivering extraordinary results that transform simple tortillas into brunch-worthy experiences that accommodate celebrations while maintaining the authentic fresh-fruit character and impressive colorful pinwheel presentation of genuine party-dessert preparation, showcasing fundamental principles of proper pudding-powder stabilization technique and strategic raspberry color-management that make every slice a celebration of American dessert innovation, fruit cheesecake tradition, and the superior satisfaction that only thoughtful multi-component methodology can provide, elevating accessible ingredients into colorful, delicious, party-defining perfection that represents the ultimate expression of fruit cheesecake roll mastery and contemporary entertaining success.
Print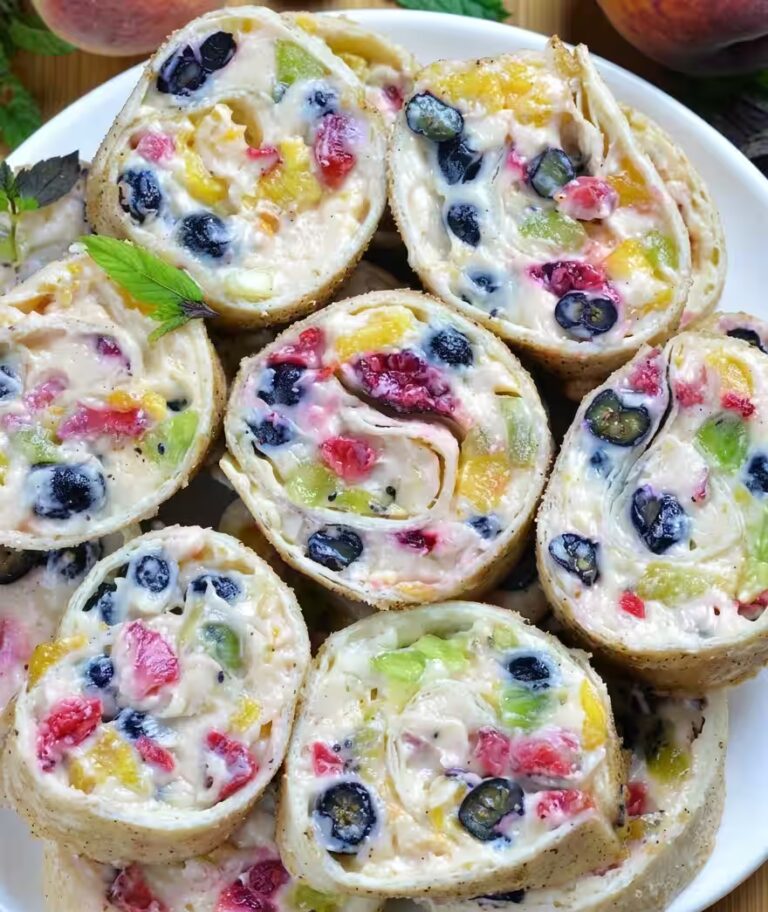
Cheesecake Fruit Salad Roll Ups: The Ultimate Cinnamon-Sugar Tortilla with Cream Cheese-Fruit Excellence
A whimsical, no-bake dessert featuring a classic cream cheese frosting filling wrapped inside vibrant, fruity sheets of Fruit Roll-Ups. Every bite is packed with a creamy vanilla center, a satisfying crunch of sandy graham cracker crumbs, and a sweet, chewy fruit finish. It’s an effortless, colorful snack that requires zero oven time.
- Total Time: 45 minutes
- Yield: 24–32 bite-sized pieces 1x
Ingredients
-
The Cheesecake Filling: 8 oz cream cheese (softened to room temperature), ½ cup powdered sugar, 1 tsp vanilla extract.
-
The Wrapper: 6 to 8 individual Fruit Roll-Ups (any flavor—Strawberry, Tropical Tie-Dye, or Blue Razz work beautifully).
-
The Crunch: 1 cup finely crushed graham cracker crumbs.
Instructions
-
Whip the Filling: In a medium bowl, beat the softened cream cheese, powdered sugar, and vanilla extract together using a hand mixer or a sturdy spatula until the mixture is completely smooth, creamy, and free of lumps.
-
Prep the Wrappers: Unroll the Fruit Roll-Ups onto a clean, flat surface or a sheet of parchment paper. Remove any plastic backing sheets.
-
Spread: Using an offset spatula or the back of a spoon, spread a thin, even layer of the cream cheese mixture across each fruit sheet, leaving a tiny quarter-inch border around the edges to prevent the filling from squeezing out.
-
Add Texture: Evenly sprinkle a generous layer of graham cracker crumbs directly over the cream cheese layer. Gently press down on the crumbs with your fingers so they embed slightly into the cream.
-
Roll Up: Starting from one end, carefully and tightly roll each Fruit Roll-Up into a log shape, just like a mini jelly roll or sushi roll.
-
Slice: Use a very sharp, smooth-edged knife to slice each log into 3 to 4 bite-sized pieces.
-
Chill: Arrange the bites on a plate or small baking sheet lined with parchment paper. Refrigerate for at least 30 minutes before serving. Chilling firms up the cream cheese filling, making them much easier to handle and giving them a clean, refreshing bite.
Notes
-
The Slicing Secret: Fruit Roll-Ups can become incredibly sticky at room temperature. For the cleanest cuts, wipe your knife with a warm, damp paper towel or rub a tiny drop of flavorless oil on the blade between slices. Alternatively, you can drop the uncut logs into the freezer for 5 minutes to firm up before slicing.
-
Flavor Play: Match your filling to your fruit sheet! You can fold a teaspoon of lemon zest into the cream cheese to pair with strawberry roll-ups, or add a pinch of cocoa powder for a chocolate-raspberry vibe.
-
Keep ‘Em Separated: When storing these in an airtight container in the fridge, make sure to layer them with parchment or wax paper. If the bare Fruit Roll-Up exteriors touch each other, they will fuse together as they sit.
- Prep Time: 15 minutes
- Cook Time: 30 minutes
- Category: Dessert
- Cuisine: American
- Diet: Vegetarian
Related posts:
 Marry Me Chicken Pasta: The Ultimate Creamy Italian Romance with Sun-Dried Tomato Excellence
 Pizza Dip: The Ultimate Hot Appetizer with Layered-Supreme Excellence
 Doritos Taco Hash Brown Casserole: The Ultimate Tex-Mex Comfort with Crispy Chip-Topped Excellence
 Cinnamon Roll Apple Lasagna: The Ultimate Breakfast Casserole Innovation Masterpiece with Cream Cheese Excellence
 Sheet Pan Bacon Alfredo Gnocchi: The Ultimate One-Pan Italian Comfort Food Masterpiece
 Cream Cheese Rotel Dip: The Ultimate Party Appetizer Experience Masterpiece
 Thumbprint Cookies
 Air Fryer Garlic Butter Steak Bites and Potatoes