Irresistible Soft and Chewy Caramel Clusters represent the perfect intersection of nostalgia and indulgence, transforming simple pantry staples into a confection that rivals any professional candy shop creation. This beloved no-bake treat captures the essence of childhood wonder while delivering the sophisticated satisfaction that adults crave. The combination of rich, buttery caramel coating crispy cornflakes creates a textural symphony that’s simultaneously crunchy and chewy, sweet and satisfying.
The Timeless Appeal of No-Bake Confections
In the world of homemade sweets, few categories hold the same universal appeal as no-bake treats. These Caramel Clusters embody everything we love about easy confectionery – they require no special equipment, no precise timing, and no fear of oven disasters. They represent the democratization of candy-making, allowing anyone to create professional-quality treats in their own kitchen with minimal effort and maximum reward.
Understanding the Science Behind the Perfect Cluster
The magic of these clusters lies in the careful balance of ingredients and the transformation that occurs when caramel meets cornflakes. The caramel coating doesn’t just bind the cereal together; it creates a protective shell that maintains the cornflakes’ inherent crunch while adding layers of rich, buttery sweetness. This chemical interaction between the hot caramel and the cereal creates the signature texture that makes these clusters so irresistible.
Ingredients You’ll Need
This recipe relies on just four simple ingredients that work together to create extraordinary results:
- 1/4 cup milk – Provides creaminess and helps create the perfect caramel consistency
- 1/2 cup unsalted butter – Adds richness and prevents the caramel from becoming too sticky
- 14 oz bag (about 50) Kraft caramels, wrappers removed – The sweet foundation that binds everything together
- 5-6 cups cornflakes – Provides the essential crunch and textural contrast
The Importance of Quality Caramels
While homemade caramel certainly has its place in confectionery, using high-quality commercial caramels like Kraft provides consistency and reliability that’s perfect for this recipe. These caramels are specifically formulated to melt smoothly and maintain their flavor integrity when heated. The standardized sugar content and moisture levels ensure that every batch of clusters turns out perfectly, eliminating the variables that can make homemade caramel unpredictable.
Step-by-Step Instructions
Preparing Your Workspace
Begin by lining two baking sheets with parchment paper and setting them aside. This preparation step is crucial – once the caramel mixture is ready, you’ll need to work quickly to form the clusters before the caramel begins to set. Having your workspace organized ensures smooth execution and prevents the mixture from hardening before you can shape it.
Creating the Caramel Base
In a large pot over medium heat, combine the milk, butter, and unwrapped caramels. The size of your pot matters – choose one that’s large enough to accommodate the cornflakes later without overcrowding. Stir the mixture often to prevent boiling and ensure a smooth, homogeneous caramel. This process typically takes 8-10 minutes, during which the caramels will gradually melt and combine with the milk and butter.
Achieving the Perfect Consistency
The key to perfect clusters lies in achieving the right caramel consistency. The mixture should be smooth, glossy, and easily stirrable without being too thick or too thin. If the caramel becomes too thick, add a tablespoon of milk. If it’s too thin, continue cooking for another minute or two. The caramel is ready when it coats the back of a spoon and flows smoothly when stirred.
Incorporating the Cornflakes
Once the caramel mixture is perfectly smooth, remove it from heat and quickly add 5 cups of cornflakes. Mix thoroughly but gently, ensuring every flake is evenly coated without crushing the cereal. The cornflakes should maintain their shape while being completely enrobed in the caramel mixture. If the mixture seems too wet or the cornflakes appear soggy, gradually add up to one more cup of cornflakes until the proper consistency is achieved.
Forming the Clusters
Using a heaping tablespoon, quickly scoop out portions of the caramel-coated cornflake mixture onto the prepared baking sheets. Aim for clusters that are approximately 1 inch in diameter – large enough to be satisfying but small enough to be manageable. Work efficiently, as the caramel will begin to set as it cools. This recipe should yield approximately 30-34 clusters, depending on their size.
The Cooling Process
Allow the clusters to cool completely on the counter at room temperature. This cooling period is essential – it’s during this time that the caramel sets and the clusters achieve their characteristic soft-yet-chewy texture. The cooling process typically takes 30-45 minutes, during which the caramel will firm up while maintaining its tender bite.
Storage and Shelf Life Considerations
Proper storage is crucial for maintaining the ideal texture and preventing the clusters from sticking together. Store the cooled clusters in a parchment-lined airtight container, placing parchment paper between layers to prevent sticking. When stored properly, these clusters will maintain their optimal texture for up to two weeks at room temperature.
Avoid refrigerating the clusters, as this can cause the caramel to become too firm and potentially sticky. Similarly, avoid storing them in humid environments, which can cause the caramel to soften excessively and make the clusters difficult to handle.
Variations and Creative Adaptations
While the classic version is perfection in its simplicity, these clusters serve as an excellent base for creative variations. Consider adding chopped nuts like pecans or almonds for extra crunch and flavor complexity. Mini chocolate chips can be folded in just before forming the clusters for a chocolate-caramel combination that’s impossible to resist.
For seasonal variations, try adding a pinch of sea salt for salted caramel clusters, or incorporate warming spices like cinnamon during the holidays. Crushed pretzels can replace some of the cornflakes for a sweet-salty combination that appeals to sophisticated palates.
Troubleshooting Common Issues
Clusters that are too soft: This usually indicates that the caramel mixture was too warm when scooped, or that there wasn’t enough cornflakes relative to the caramel. Allow the mixture to cool slightly before scooping, or add more cornflakes.
Clusters that are too hard: This typically results from overcooking the caramel or letting it cool too much before forming. The caramel should be smooth and easily stirrable when you add the cornflakes.
Uneven coating: Ensure you’re stirring gently but thoroughly when combining the cornflakes with the caramel. Every flake should be visible coated, but avoid overmixing, which can break the cereal.
Sticky clusters: This often occurs when the caramel contains too much moisture or when the clusters are stored improperly. Ensure the caramel mixture is the proper consistency and store with parchment paper between layers.
The Perfect Occasions for Caramel Clusters
These clusters are incredibly versatile treats that work for numerous occasions. They’re perfect for holiday cookie exchanges, school bake sales, and potluck gatherings. Their individual serving size makes them ideal for parties, while their homemade appeal makes them wonderful hostess gifts when packaged in decorative containers.
They’re also excellent for last-minute entertaining, as they can be made quickly and don’t require any special skills or equipment. Children love helping to make them, making them perfect for family cooking activities and teaching basic kitchen skills.
Nutritional Considerations and Portion Control
While these clusters are undoubtedly a treat rather than health food, they do offer some nutritional benefits. The cornflakes provide some vitamins and minerals, while the milk and butter contribute calcium and protein. However, they’re best enjoyed in moderation as part of a balanced diet.
The individual cluster format naturally encourages portion control, making it easier to enjoy these treats without overindulging. Each cluster provides a satisfying sweet experience that can curb cravings without requiring a large serving size.
Professional Tips for Perfect Results
Temperature control: Maintain medium heat throughout the melting process. High heat can cause the caramel to burn or become grainy, while low heat may result in uneven melting.
Timing is everything: Work quickly once the cornflakes are added. The caramel will begin to set as it cools, making it difficult to form uniform clusters if you wait too long.
Quality ingredients: Use fresh cornflakes for the best texture. Stale cereal can become soggy and won’t provide the desired crunch.
Consistent sizing: Use a cookie scoop or measuring spoon to ensure uniform cluster size, which promotes even cooling and professional appearance.
Gentle handling: Avoid overmixing the cornflakes into the caramel, as this can break the cereal and create a mushy texture.
Frequently Asked Questions
Q: Can I use homemade caramel instead of store-bought caramels? A: While possible, store-bought caramels provide more consistent results. If using homemade caramel, ensure it’s the proper consistency and temperature.
Q: What if I don’t have cornflakes? A: You can substitute with other cereals like Rice Krispies, but the texture will be different. Cornflakes provide the ideal balance of crunch and structure.
Q: How long do these clusters last? A: When stored properly in an airtight container, they maintain optimal quality for up to two weeks at room temperature.
Q: Can I freeze these clusters? A: Yes, they can be frozen for up to three months. Thaw at room temperature before serving.
Q: Why are my clusters falling apart? A: This usually indicates insufficient caramel coating or caramel that was too cool when mixed. Ensure every flake is well-coated and the caramel is properly melted.
Q: Can I make these without butter? A: The butter is essential for proper texture and flavor. Without it, the caramel may be too sticky and the clusters won’t set properly.
Q: What’s the best way to remove caramel wrappers quickly? A: Slightly warm the caramels in the microwave for 10-15 seconds to make the wrappers easier to remove.
Q: Can I add chocolate to these clusters? A: Yes, you can fold in mini chocolate chips just before forming the clusters, or drizzle melted chocolate over the cooled clusters for decoration.
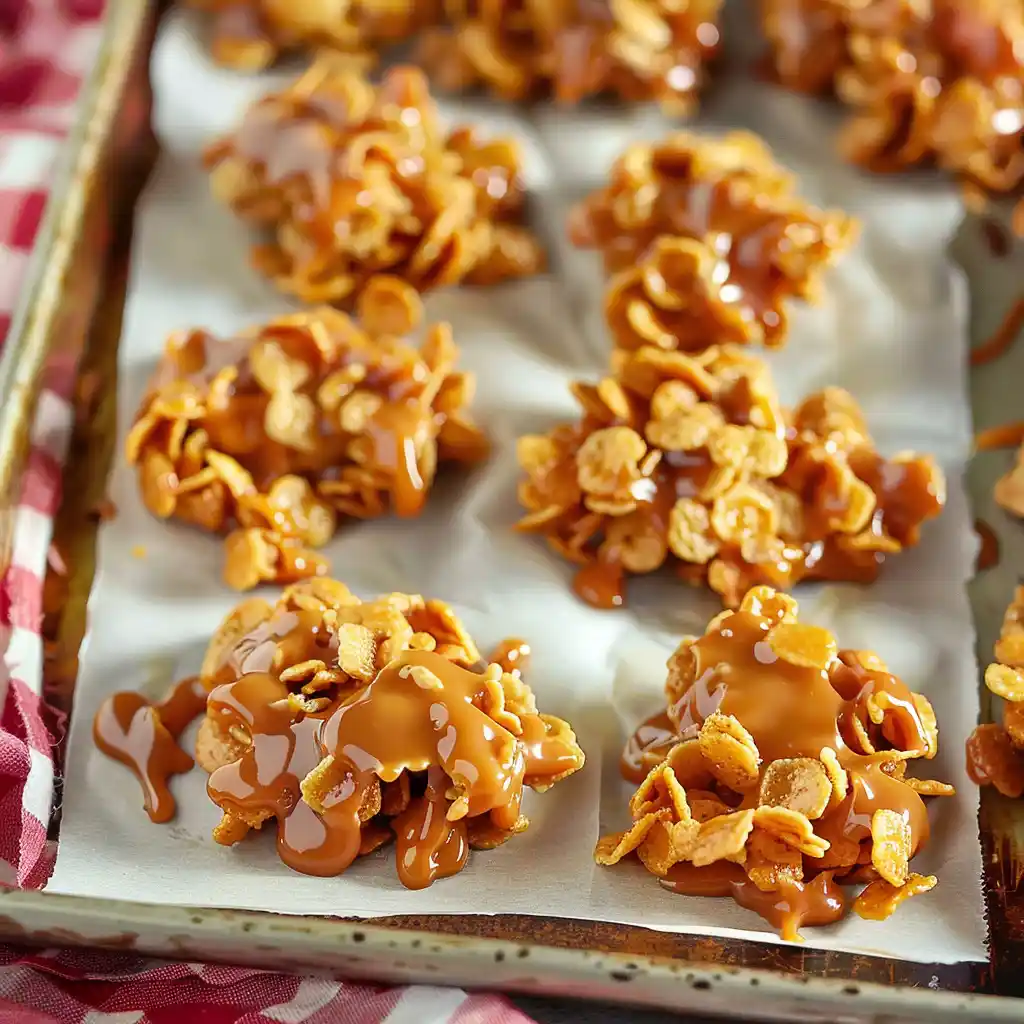
Irresistible Soft and Chewy Caramel Clusters
Ingredients
Method
- Prepare Baking Sheets: Line 2 baking sheets with parchment paper and set aside. This preparation is essential to prevent the caramel clusters from sticking and makes for easy cleanup afterward.
- Melt Caramel Mixture: In a large pot over medium heat, melt the milk, butter, and unwrapped caramels. Stir often to prevent boiling and ensure a smooth mixture. This process may take 5-7 minutes – be patient and keep stirring to avoid any burning or uneven melting.
- Combine With Cornflakes: Once the caramel mixture is melted and well combined, add 5 cups of cornflakes. Mix thoroughly until the flakes are evenly coated. If needed, add up to 1 more cup of cornflakes. The mixture should be well-coated but not dry – each cornflake should glisten with caramel.
- Form Clusters: Using a heaping tablespoon, scoop out the caramel-coated cornflake mixture onto the prepared baking sheets, forming 1-inch clusters. You should get about 30-34 clusters. Work quickly as the mixture will start to set as it cools.
- Cool and Set: Allow the clusters to cool completely on the counter. They will harden into soft and chewy clusters. Store in a parchment-lined airtight container, with parchment paper between layers to prevent sticking.
Notes
- For a flavor variation, try adding 1/2 cup of chopped nuts, a sprinkle of sea salt on top, or drizzle with melted chocolate after cooling. You can also use different cereals like Rice Krispies or a mixture of cereals for varied texture. The clusters can be stored at room temperature for up to a week or refrigerated for longer freshness.