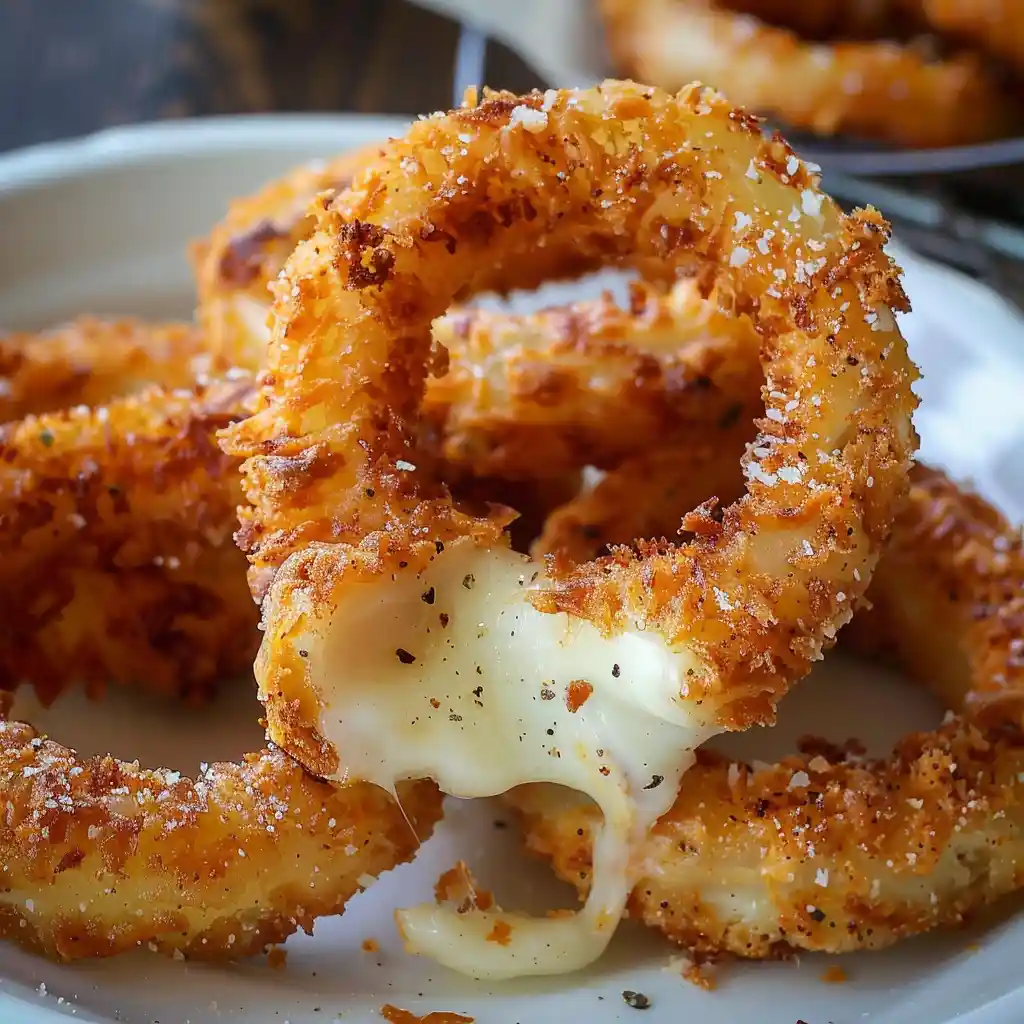
When traditional onion rings meet the irresistible pull of melted mozzarella cheese, the result is Cheesy Mozzarella Onion Rings – a dish that transforms a classic appetizer into something absolutely extraordinary. This innovative recipe takes the beloved crispy onion ring and elevates it with a molten cheese center that stretches and oozes with every bite. Perfect for game day gatherings, family dinners, or when you want to impress guests with a creative twist on a familiar favorite, these cheese-stuffed rings deliver both visual impact and incredible flavor.
The Art of Stuffed Appetizer Innovation
What makes these mozzarella onion rings so remarkable is their ingenious construction that creates the perfect balance of textures and flavors. The double-layered onion ring structure provides the ideal vessel for the melted cheese, while the crispy Panko coating adds textural contrast to the tender onions and gooey mozzarella. The result is an appetizer that’s both familiar and surprising, combining the best elements of onion rings and mozzarella sticks into one irresistible bite.
This recipe also demonstrates the beauty of creative cooking techniques that maximize both flavor and presentation. The nested onion ring method ensures the cheese stays perfectly contained during frying, while the three-stage breading process creates an incredibly crispy exterior that holds up to the molten cheese interior. The final result is a dish that’s as Instagram-worthy as it is delicious.
Essential Ingredients for Success
The Foundation:
- 1 large onion, sliced into thick rings
- 8 mozzarella cheese sticks
- Toothpicks for securing
The Coating System:
- 1 cup all-purpose flour
- 1 teaspoon baking powder
- 1 teaspoon fine salt
- 1 cup milk
- 1 large egg, beaten
- 1 cup Panko bread crumbs
For Frying:
- 2 cups cooking oil
- Marinara sauce for dipping
Step-by-Step Preparation Guide
Onion Ring Assembly: Begin by slicing your large onion into thick rings, approximately 1/2 to 3/4 inch thick. Separate the rings and pair them strategically – you’ll need one larger ring and one smaller ring for each serving. The key is creating a perfect nest where the smaller ring fits snugly inside the larger one, leaving a gap between the layers that will hold the cheese.
Cheese Preparation: Take the mozzarella cheese sticks and slice them lengthwise into halves or thirds, depending on the size of your onion rings. The cheese pieces should fit snugly into the gap between the nested onion rings without protruding significantly. This step is crucial for ensuring the cheese stays contained during the frying process.
Securing the Assembly: Nest the smaller onion ring inside the larger ring, then carefully fit the sliced mozzarella into the gap between them. The cheese should be snug but not compressed. Secure each assembly with a toothpick inserted through both onion layers and the cheese. This toothpick is essential for keeping everything together during the breading and frying process.
Flour Mixture Preparation: In a mixing bowl, thoroughly combine the all-purpose flour, baking powder, and fine salt. Whisk these dry ingredients together to ensure even distribution of the leavening agent and seasoning. The baking powder will help create a lighter, crispier coating.
Initial Dredging: Dredge each assembled onion ring in the seasoned flour mixture, ensuring all surfaces are evenly coated. This first flour coating helps the batter adhere properly and creates the foundation for the crispy exterior. Place the coated rings on a wire rack to prevent sticking.
Batter Creation: In a separate bowl, whisk together the milk and beaten egg until well combined. Gradually add this liquid mixture to any remaining seasoned flour, stirring continuously to create a smooth, lump-free batter. The batter should be thick enough to coat the onion rings but not so thick that it becomes gloopy.
Batter Coating: Dip each floured onion ring into the batter, allowing excess to drip off. The batter should coat the entire surface evenly, creating a base that will help the breadcrumbs adhere. Work quickly but carefully to maintain the integrity of the cheese-filled assembly.
Breadcrumb Coating: Roll each battered onion ring in Panko breadcrumbs, pressing gently to ensure the crumbs adhere to all surfaces. Panko breadcrumbs are essential for achieving maximum crispiness – they create a lighter, crunchier coating than regular breadcrumbs. Return the coated rings to the wire rack.
Oil Heating and Frying: Heat the cooking oil in a deep pot to exactly 350°F (175°C). Maintaining the correct temperature is crucial for achieving the perfect texture – too hot and the outside will burn before the cheese melts, too cool and the coating will be greasy. Use a candy thermometer for accuracy.
Frying Process: Using a slotted spoon or tongs, gently lower the breaded onion rings into the hot oil. Fry in small batches to maintain oil temperature, turning once halfway through cooking. Each batch should take about 3-4 minutes total, until the coating is golden brown and crispy on all sides.
Draining and Serving: Remove the fried onion rings from the oil and place them on paper towels to drain excess oil. Allow them to cool for 1-2 minutes before carefully removing the toothpicks. Serve immediately while the cheese is still molten and stretchy.
Professional Tips for Perfect Results
Onion Selection: Choose large, sweet onions like Vidalia or Walla Walla for the best flavor and ring structure. The onions should be fresh and firm, with rings that separate cleanly without breaking. Avoid onions that are soft or have begun to sprout.
Cheese Considerations: Use whole milk mozzarella sticks rather than part-skim for better melting properties and stretch. The cheese should be cold when you assemble the rings, as this helps it hold its shape during breading and ensures it melts evenly during frying.
Temperature Control: Maintain oil temperature consistently at 350°F. If the temperature drops too much between batches, allow it to return to 350°F before adding the next batch. This ensures even cooking and prevents greasy results.
Breading Technique: Set up your breading station in order: flour, batter, breadcrumbs. Keep one hand for dry ingredients and one for wet to prevent coating your fingers. This assembly line approach ensures smooth, efficient breading.
Timing is Everything: These onion rings are best served immediately after frying while the cheese is still molten. If you need to keep them warm, place them on a wire rack in a 200°F oven for up to 10 minutes, but no longer or the cheese will begin to set.
Serving Suggestions and Variations
These cheesy mozzarella onion rings are perfect as an appetizer or side dish and pair beautifully with marinara sauce, ranch dressing, or garlic aioli. The warm, gooey cheese and crispy coating make them irresistible finger food that’s perfect for sharing.
Dipping Sauce Options:
- Classic marinara sauce
- Garlic aioli or ranch dressing
- Spicy sriracha mayo
- Honey mustard for sweet contrast
Cheese Variations:
- Cheddar cheese sticks for a sharper flavor
- Pepper jack for a spicy kick
- String cheese for easier handling
- Goat cheese for gourmet appeal
Flavor Enhancements:
- Add Italian herbs to the flour mixture
- Include garlic powder in the breading
- Sprinkle with parmesan after frying
Make-Ahead and Storage Options
While these onion rings are best enjoyed fresh, you can prepare them partially in advance. The assembled and breaded rings can be frozen for up to 1 month before frying. Freeze them on a baking sheet until solid, then transfer to freezer bags. Fry directly from frozen, adding 1-2 minutes to the cooking time.
The flour mixture can be prepared days ahead and stored in an airtight container. The batter should be made fresh for best results, as it doesn’t store well and can become lumpy or separate over time.
Leftover onion rings can be reheated in a 400°F oven for 5-7 minutes to restore crispiness, though the cheese won’t be as molten as when fresh.
Frequently Asked Questions
Q: Can I bake these instead of frying? A: Yes, but the texture will be different. Bake at 425°F for 15-20 minutes, turning once. The coating won’t be as crispy as the fried version, but they’ll still be delicious.
Q: What if I don’t have Panko breadcrumbs? A: Regular breadcrumbs work, but Panko creates a much crispier coating. You can make your own by processing stale bread in a food processor until you get coarse crumbs.
Q: How do I prevent the cheese from leaking out? A: Make sure the cheese fits snugly in the gap and that the toothpick secures both onion layers. Don’t overstuff with cheese, and ensure your oil temperature is accurate.
Q: Can I use a different type of onion? A: Sweet onions work best, but yellow onions are fine too. Avoid red onions as they can be too strong, and white onions may be too mild for this application.
Q: What if my batter is too thick or too thin? A: If too thick, add milk 1 tablespoon at a time. If too thin, add a little flour. The batter should coat the back of a spoon but still drip off easily.
Q: Can I make these gluten-free? A: Yes, substitute all-purpose flour with a gluten-free flour blend and use gluten-free breadcrumbs. The texture may be slightly different but still delicious.
Q: How do I know when the oil is the right temperature? A: Use a candy thermometer for accuracy. If you don’t have one, test with a small piece of bread – it should sizzle immediately and brown within 30 seconds.
Q: What’s the best way to cut the mozzarella sticks? A: Use a sharp knife and cut lengthwise. If the cheese is too soft, chill it in the refrigerator for 30 minutes before cutting to make it easier to handle.
Q: Can I prepare these for a crowd? A: Yes, but fry in small batches to maintain oil temperature. Keep finished rings warm in a 200°F oven on a wire rack while you finish the remaining batches.
Q: Why do I need to remove the toothpicks before serving? A: The toothpicks are only needed during preparation and cooking. Remove them before serving for safety and better eating experience. The fried coating will hold the assembly together once cooked.
Print
Cheesy Mozzarella Onion Rings
A crispy, golden appetizer featuring thick onion rings stuffed with melty mozzarella cheese, coated in a light batter and crunchy panko breadcrumbs for the perfect blend of savory flavors and contrasting textures.
- Total Time: 35 minutes
- Yield: 8 stuffed onion rings 1x
Ingredients
Main Components
- 1 large onion, sliced into thick rings
- 8 mozzarella cheese sticks
- 1 cup milk
- 1 large egg, beaten
- 1 cup Panko bread crumbs
- 2 cups cooking oil
- toothpicks, for securing
Dry Ingredients
- 1 cup all-purpose flour
- 1 teaspoon baking powder
- 1 teaspoon fine salt
Instructions
- Prepare the Onion Rings
- Begin by pairing two slices of onion rings, choosing one larger and one smaller ring. Nest the smaller onion ring inside the larger one, creating a gap between the layers. Take your mozzarella cheese sticks, slice them lengthwise, and carefully fit the cheese into the gap between the onion rings. Use toothpicks to secure each assembly, ensuring the cheese stays in place during the coating and frying process.
- Mix the Dry Ingredients
- In a mixing bowl, combine the all-purpose flour, baking powder, and fine salt. Stir thoroughly to ensure even distribution of the leavening agent and seasoning throughout the flour mixture. This dry mixture will be the first coating for your onion rings.
- Coat with Flour Mixture
- Take each stuffed onion ring and dredge it completely in the flour mixture, ensuring all surfaces are evenly coated. This initial coating helps the batter adhere better to the onion rings. Place the coated rings on a wire rack while preparing the batter.
- Prepare the Batter
- In a separate bowl, whisk together the milk and beaten egg until well combined. Gradually add this liquid mixture to any remaining seasoned flour, stirring continuously to form a smooth batter without lumps. The consistency should be thick enough to coat the onion rings but not too thick to weigh them down.
- Apply Final Coating
- Dip each floured onion ring into the prepared batter, allowing any excess to drip off. Then roll the coated rings in Panko breadcrumbs, ensuring all sides are thoroughly covered for maximum crispiness. Return the fully coated rings to the wire rack.
- Fry the Onion Rings
- Heat the cooking oil in a deep pot to 350°F (175°C). Using a slotted spoon or tongs, carefully lower the breaded onion rings into the hot oil. Work in batches to avoid overcrowding, which would lower the oil temperature. Fry each batch for about 3-4 minutes, turning once, until both sides are golden brown and crispy. Remove from oil and place on paper towels to drain excess oil.
- Serve
- Before serving, carefully remove the toothpicks from each onion ring. Serve the rings hot, when the cheese is still melty and stretchy. Pair with marinara sauce for dipping to enhance the Italian-inspired flavor profile.
Notes
- For best results, use low-moisture mozzarella sticks as they melt well without releasing too much moisture into the coating.
- Make sure your oil maintains a constant temperature of 350°F; too hot and the outside will burn before the cheese melts, too cool and the rings will absorb too much oil.
- These can be prepared ahead of time up to the breading stage and refrigerated for a few hours before frying.
- For a spicier version, add 1/2 teaspoon of cayenne pepper to the dry ingredients.
- If you don’t have a deep fryer or thermometer, test the oil by dropping a small piece of bread in—it should brown in about 60 seconds when the oil is ready.
- Prep Time: 20 minutes
- Cook Time: 15 minutes
- Category: Appetizers
- Method: Frying
- Cuisine: Italian-American
- Diet: Vegetarian
Nutrition
- Serving Size: 1 stuffed onion ring
- Calories: 240
- Sugar: 3g
- Sodium: 390mg
- Fat: 13g
- Saturated Fat: 5g
- Unsaturated Fat: 7g
- Trans Fat: 0g
- Carbohydrates: 20g
- Fiber: 1g
- Protein: 9g
- Cholesterol: 35mg